


OOP Design Patterns and Anti-Patterns: What Works and What Fails

Writing clean, maintainable, and scalable code sounds easy as a requirement, but is a constant challenge when developing real-world applications.
As projects grow, the task becomes more complex. One way to simplify it is by identifying recurring design problems, which can be solved using appropriate design patterns.
Design patterns are proven, reusable solutions to common software design problems. They provide best practices and structured approaches for solving recurring challenges. These patterns are not concrete implementations but templates or guidelines that can be adapted to specific use cases.
But what makes design patterns important? Here are a few basic reasons:
Patterns often encourage modular and reusable code.
Well-structured designs make the codebase easier to understand, modify, and extend.
Patterns allow new features to be added without major rewrites.
Design patterns provide a common vocabulary for discussing software architecture, improving collaboration among developers.
However, anti-patterns also exist. They are often bad practices that lead to unmaintainable, inefficient, and overly complex code.
From a developer’s perspective, understanding both design patterns and anti-patterns is essential for writing high-quality software. Knowing design patterns helps developers apply the right solutions to common problems while recognizing anti-patterns allows them to avoid common mistakes that lead to bad architecture.
In this article, we’ll first look at the most popular OOP Design Patterns. Then, we will also investigate the common anti-patterns that should be avoided.
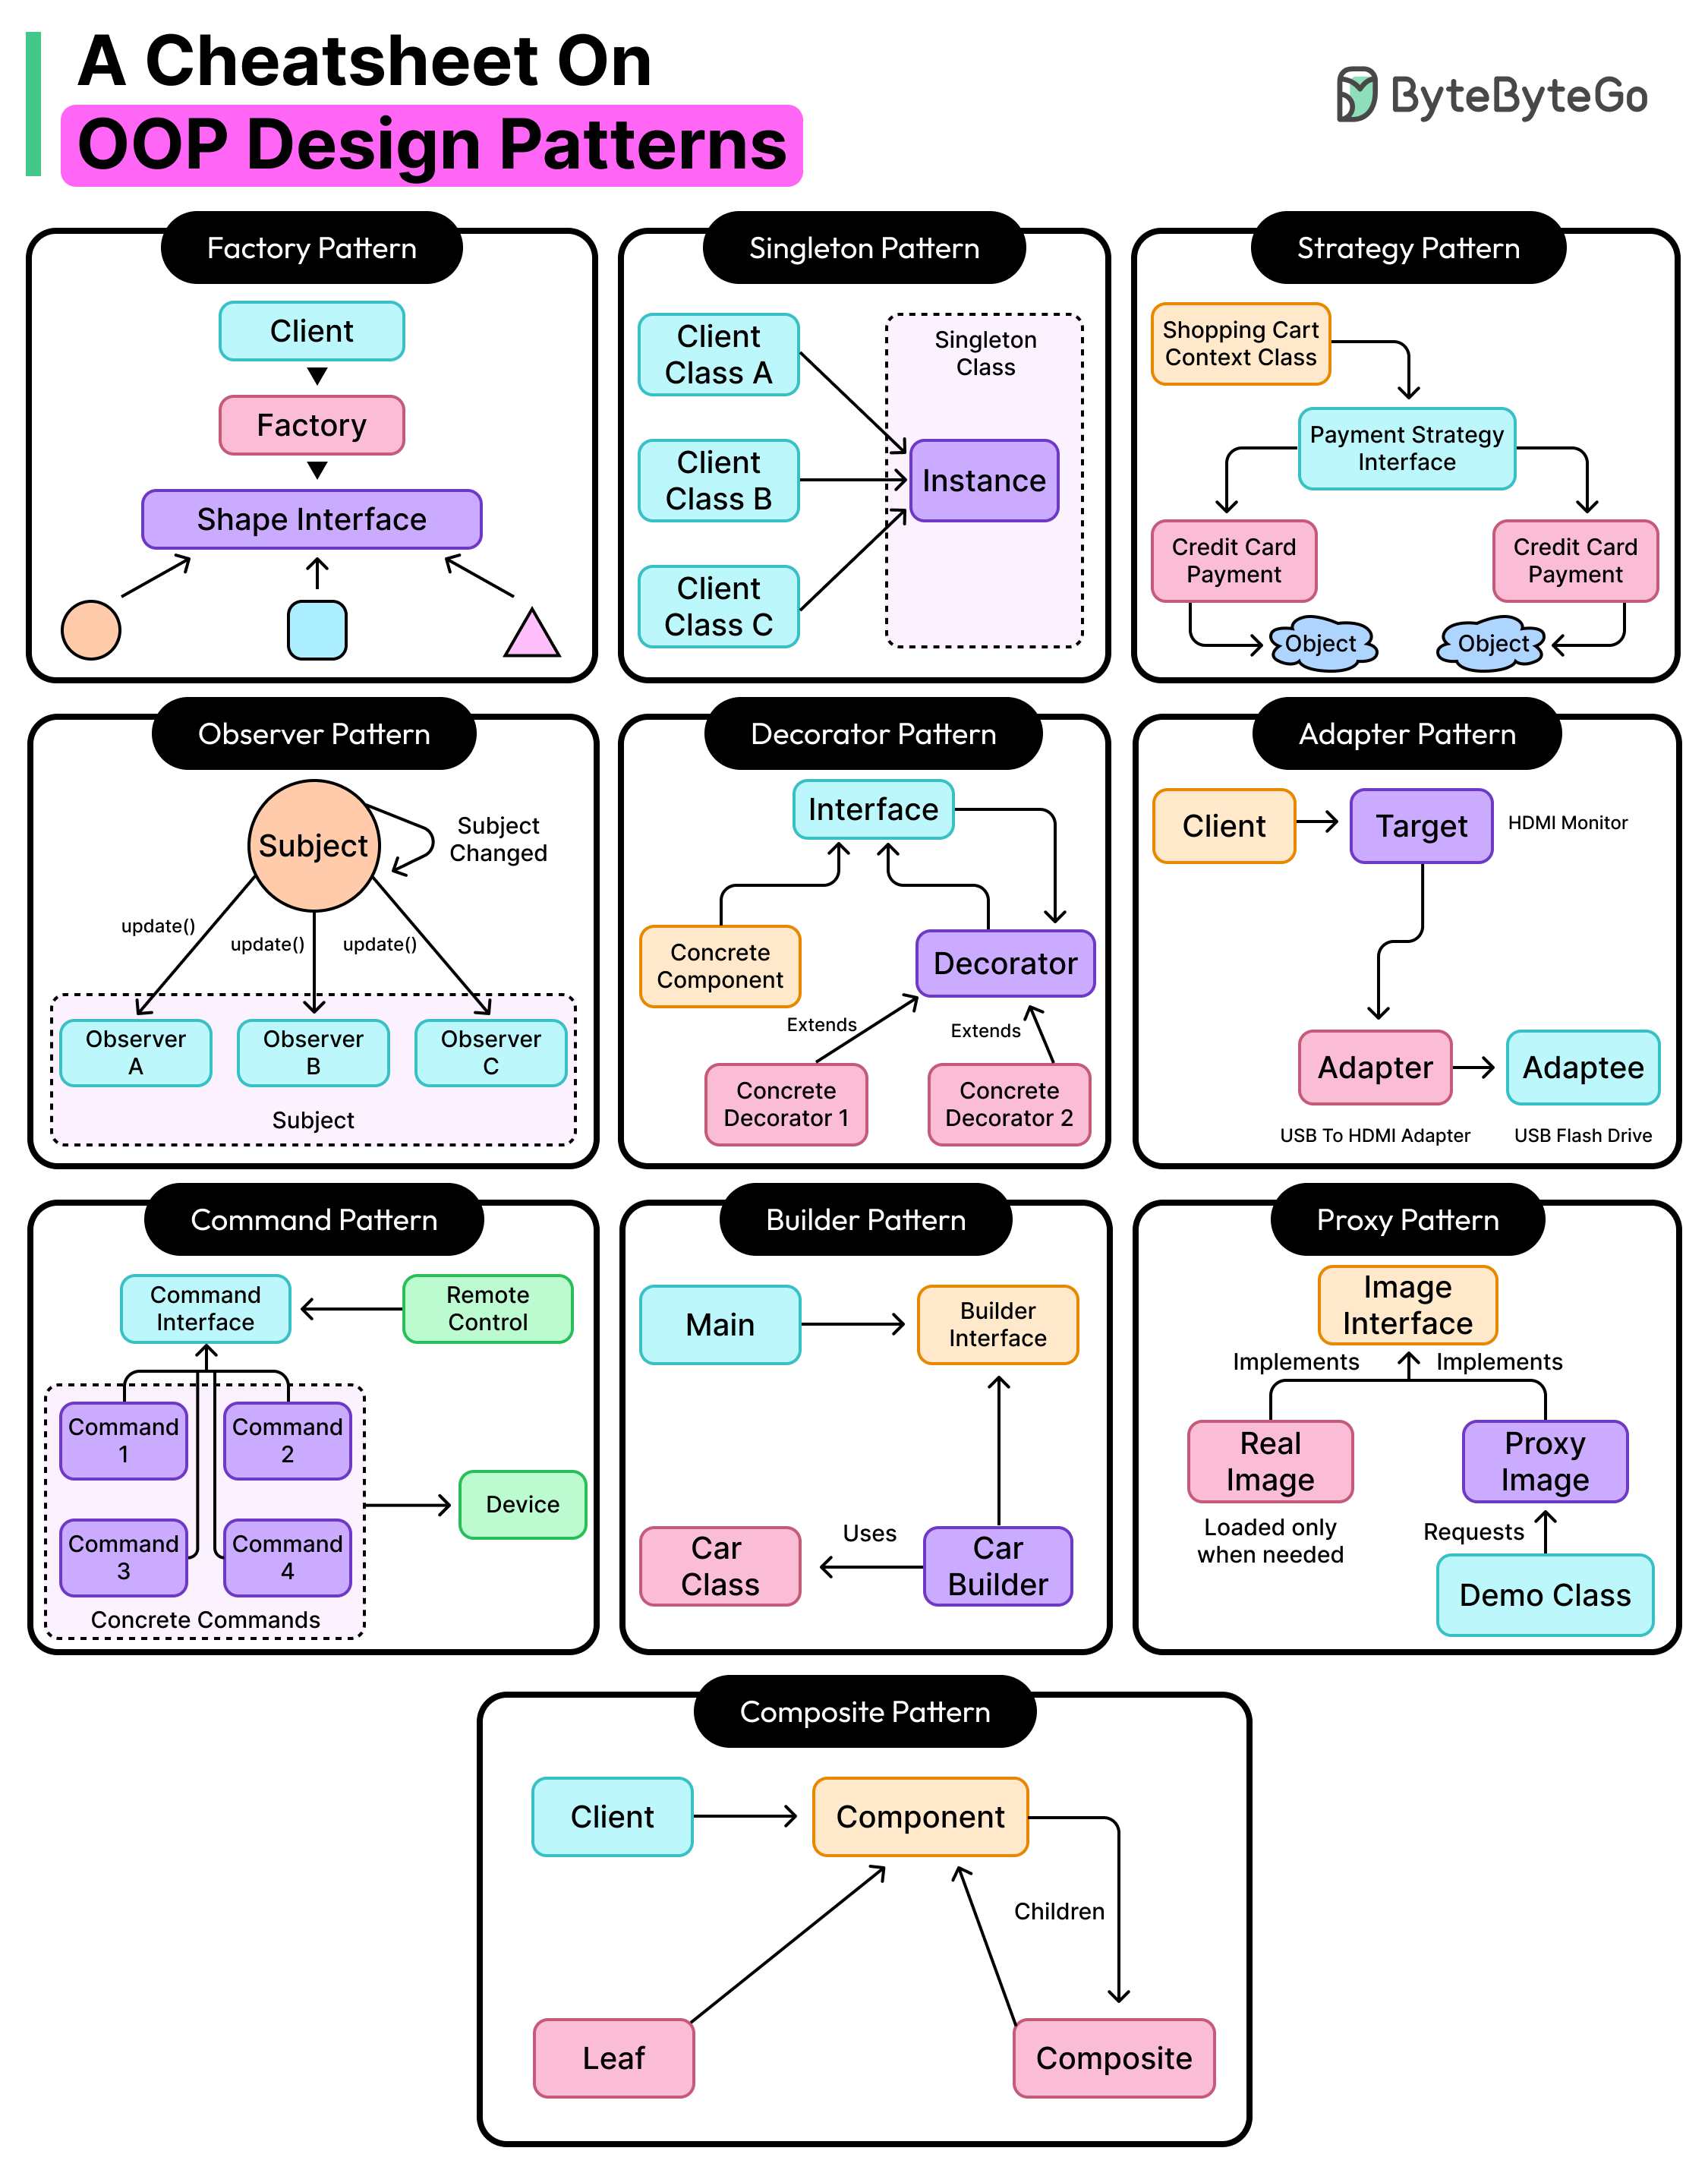
Popular OOP Design Patterns
Let us now examine the most popular OOP Design Patterns. For each pattern, we will understand its core meaning, describe the pattern with an example, and discuss its benefits and potential pitfalls.
Factory Pattern
The factory pattern is a creational design pattern that provides a centralized mechanism for creating objects.
Creating objects using the new keyword can lead to tight coupling between the client code and specific implementations. See the example below:
// Shape Interface
interface Shape {
    void draw();
}

// Concrete Implementations
class Circle implements Shape {
    @Override
    public void draw() {
        System.out.println("Drawing a Circle");
    }
}

class Square implements Shape {
    @Override
    public void draw() {
        System.out.println("Drawing a Square");
    }
}

// Client Code (Violating OCP & Creating Hardcoded Dependencies)
public class DrawingApp {
    public static void main(String[] args) {
        // Direct object creation using 'new' keyword
        Shape shape1 = new Circle();
        shape1.draw(); // Output: Drawing a Circle

        Shape shape2 = new Square();
        shape2.draw(); // Output: Drawing a Square
    }
}
Here, the DrawingApp class directly depends on the Circle and Square classes. If a new shape is introduced, the client must be modified to accommodate it. It violates the open/closed principle. Also, changing implementations requires modifying all occurrences of the previous class.
The factory pattern helps centralize object creation, ensuring the client code remains unaware of concrete implementations. New types can be added with minimal modifications. The factory pattern can be thought of as a restaurant kitchen. Customers do not cook their food. Instead, they place an order, and the kitchen prepares the dish and provides it to them.
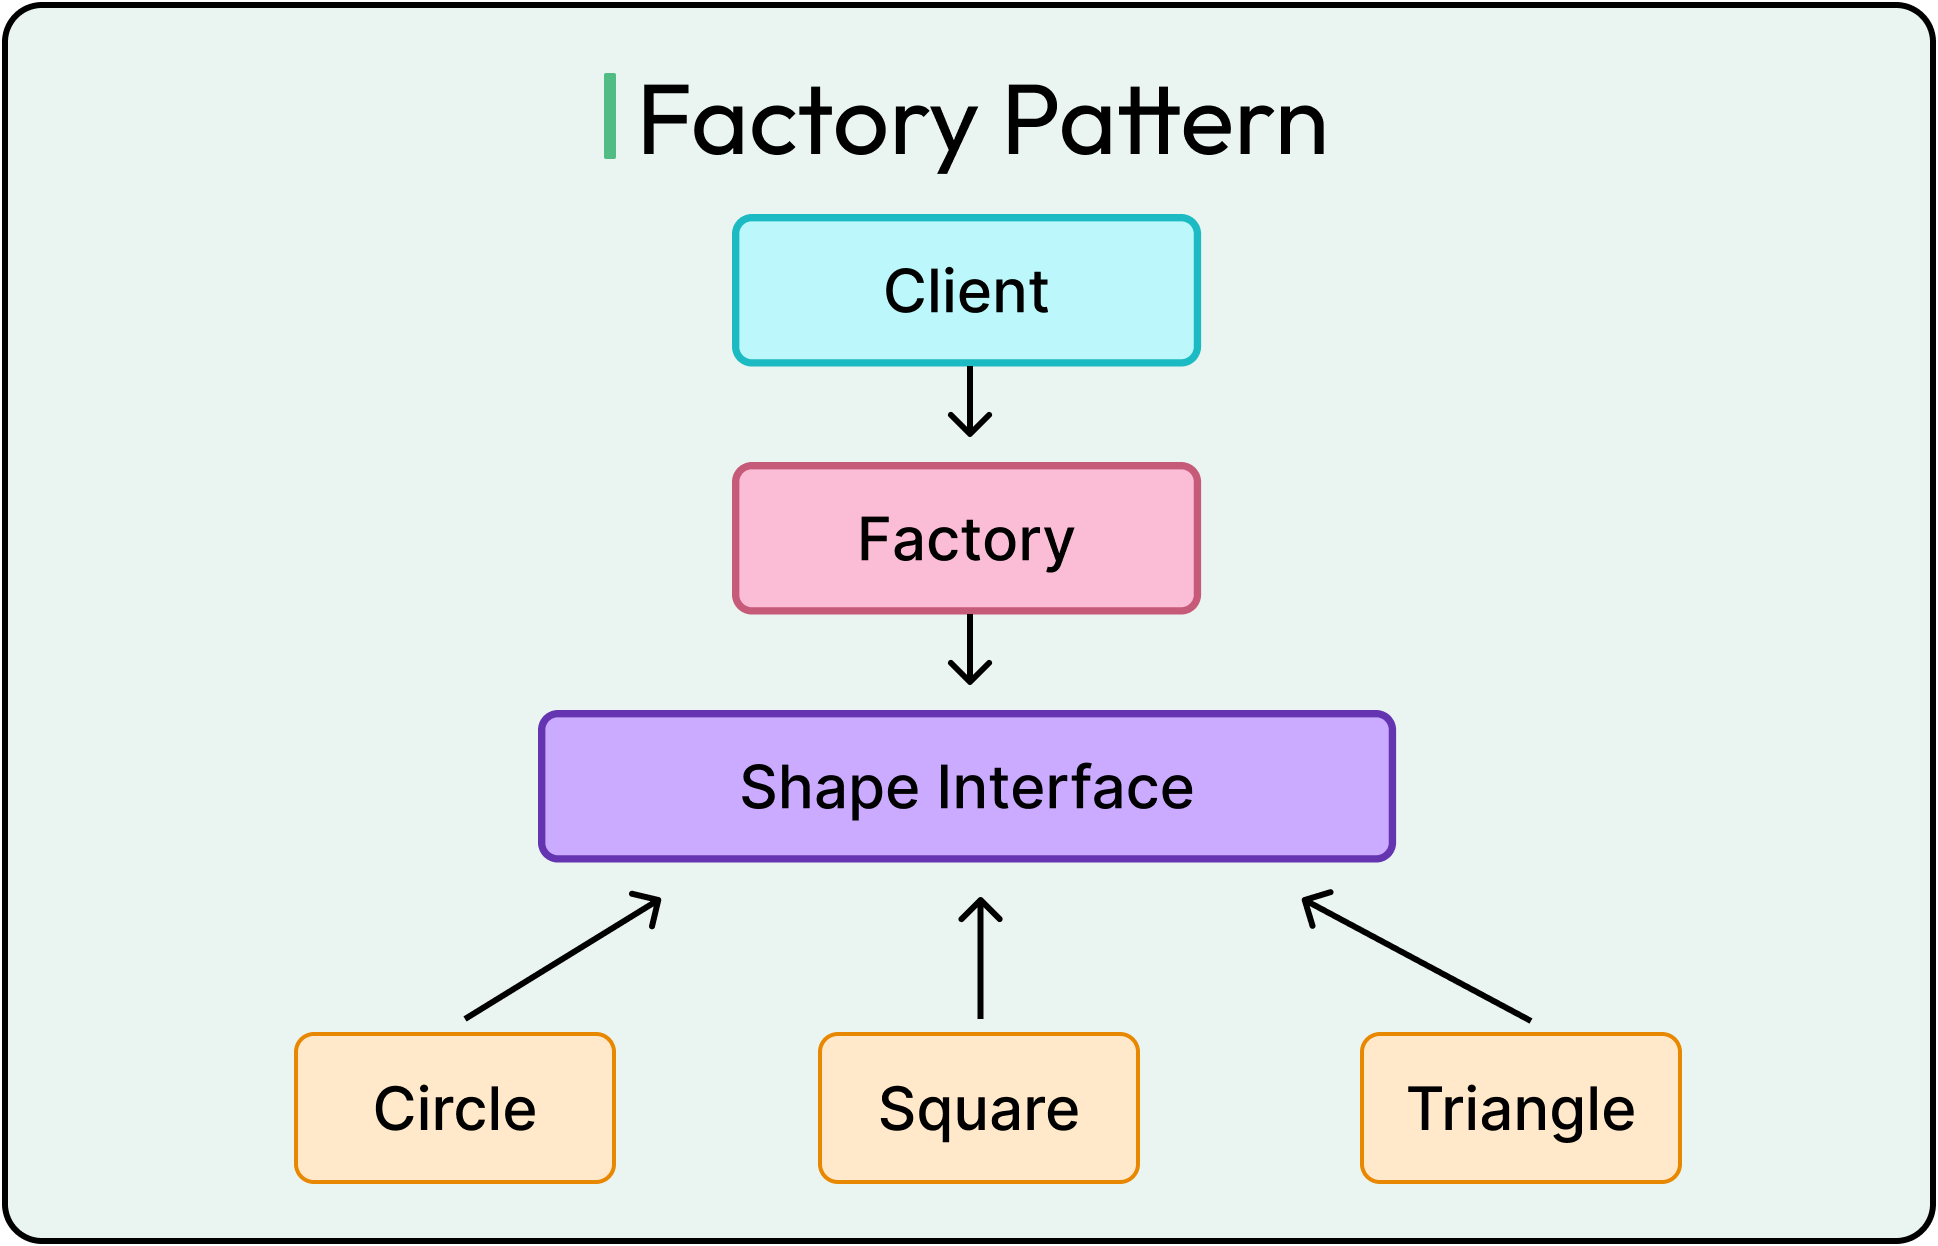
See the code example below of a simple factory class for creating shape objects and its usage in the main class (which acts as the client code) in the example:
class ShapeFactory {
    // Factory method to create Shape objects based on input type
    public static Shape getShape(String shapeType) {
        if (shapeType == null) {
            throw new IllegalArgumentException("Shape type cannot be null");
        }
        if (shapeType.equalsIgnoreCase("Circle")) {
            return new Circle();
        } else if (shapeType.equalsIgnoreCase("Square")) {
            return new Square();
        }
        throw new IllegalArgumentException("Unknown shape type: " + shapeType);
    }
}

public class Main {
    public static void main(String[] args) {
        // Creating shapes using the factory
        Shape shape1 = ShapeFactory.getShape("Circle");
        shape1.draw();  // Output: Drawing a Circle

        Shape shape2 = ShapeFactory.getShape("Square");
        shape2.draw();  // Output: Drawing a Square
    }
}
Note that this is just a basic code example to demonstrate the concept.
As mentioned, the factory pattern helps reduce coupling and encapsulate the complexity of creating an object. The instantiation logic is now in one place, making it easier to manage. When dealing with families of related objects, the abstract factory pattern extends this idea by centralizing the creation of entire groups of objects, ensuring consistency and reducing duplication.
However, the factory pattern also has some downsides that should be considered:
For simple object creation, a factory may be an unnecessary overhead.
If a single factory manages too many different object types, the factory class can become too large and difficult to maintain.
If a new shape is added, the factory needs to be changed. Thus, the open/closed principle is not completely avoided, but its violation is restricted to the factory class. Techniques to prevent this violation in factory classes, such as using a registry-based factory, are also available.
Singleton Pattern
The singleton pattern is a creational design pattern that ensures a class has only one instance throughout an application's lifecycle.
See the diagram below that shows the concept of this pattern:
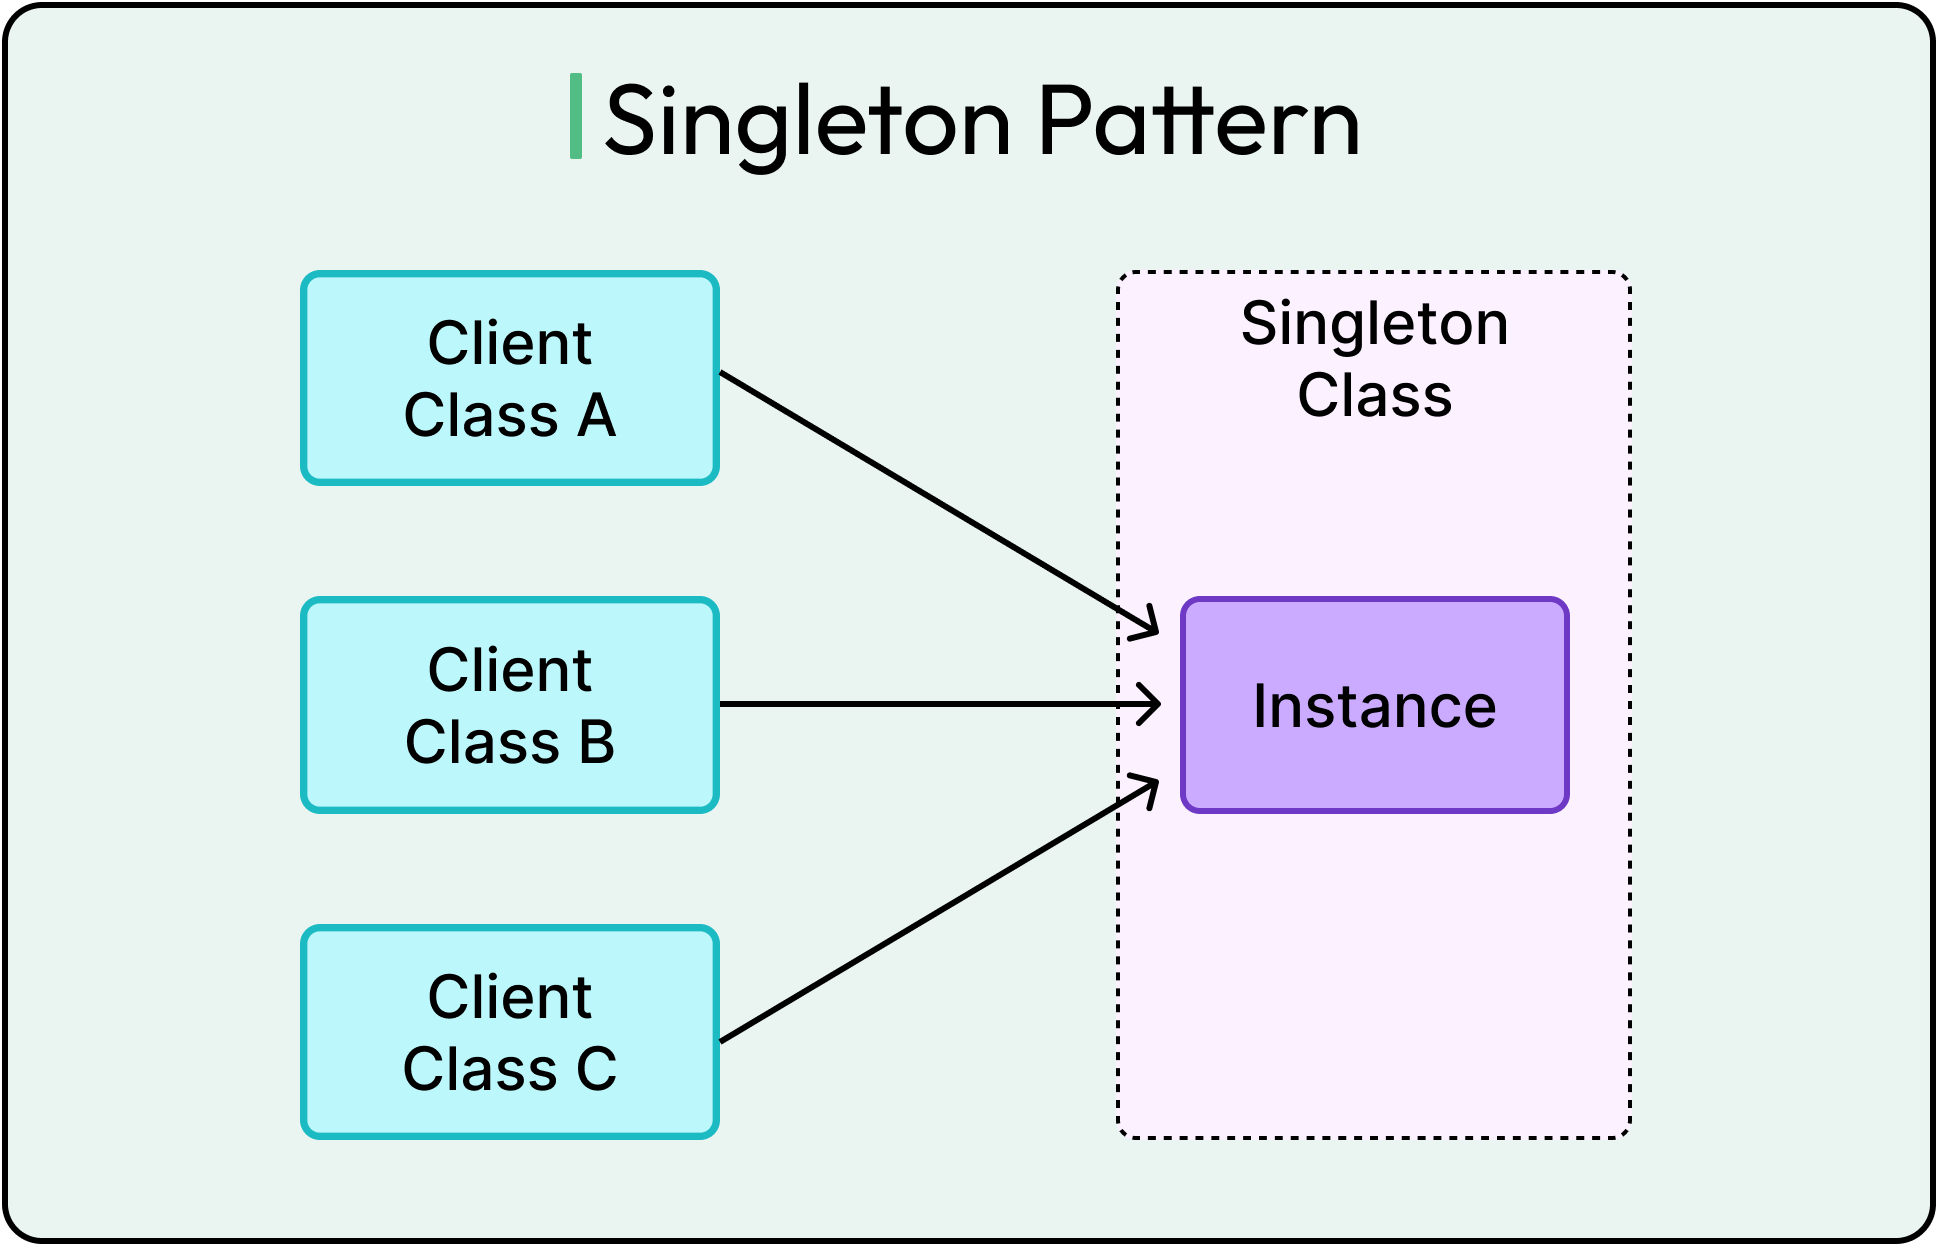
In many scenarios, multiple instances of a class can cause issues, such as redundant memory usage, race conditions, or inconsistent states. The singleton pattern helps side-step such problems.
Some common use cases of this pattern are in database connection objects, logging instances, and configuration manager instances.
To properly implement a singleton, it must satisfy a few basic conditions:
Restrict object creation.
Provide a global access method.
Ensure thread safety in multi-threaded environments.
Here’s a code example of a basic singleton, which is not thread-safe.
class BasicSingleton {
    private static BasicSingleton instance;

    private BasicSingleton() {} // Private constructor prevents direct instantiation

    public static BasicSingleton getInstance() {
        if (instance == null) {
            instance = new BasicSingleton();
        }
        return instance;
    }
}
To make the singleton thread safe, we use double-checked locking with the volatile keyword.
class Singleton {
    private static volatile Singleton instance; // Volatile ensures visibility across threads

    private Singleton() {} // Private constructor to prevent instantiation

    public static Singleton getInstance() {
        if (instance == null) { // First check
            synchronized (Singleton.class) {
                if (instance == null) { // Second check (after acquiring lock)
                    instance = new Singleton();
                }
            }
        }
        return instance;
    }
}
The synchronized block ensures only one thread can initialize the instance at a time and the volatile keyword provides visibility of the instance across threads. Double-checking is helpful to avoid synchronizing the method every time because synchronization can be costly if done repeatedly.
On a side note, this singleton implementation can be broken using reflection in Java. To avoid that, another way of creating singletons is by using Enums in Java. However, the Enum approach does not support lazy initialization.
Overall, the singleton pattern is a great way to manage shared resources within an application context. Since a singleton is initialized only when required, it also potentially saves memory.
However, the pattern also has downsides:
Singletons introduce a global state, which can lead to unexpected side effects in large applications.
Since singletons cannot be easily replaced or mocked, they make unit testing harder.
Since singletons live throughout the application lifecycle, poorly designed singletons can cause memory leaks.
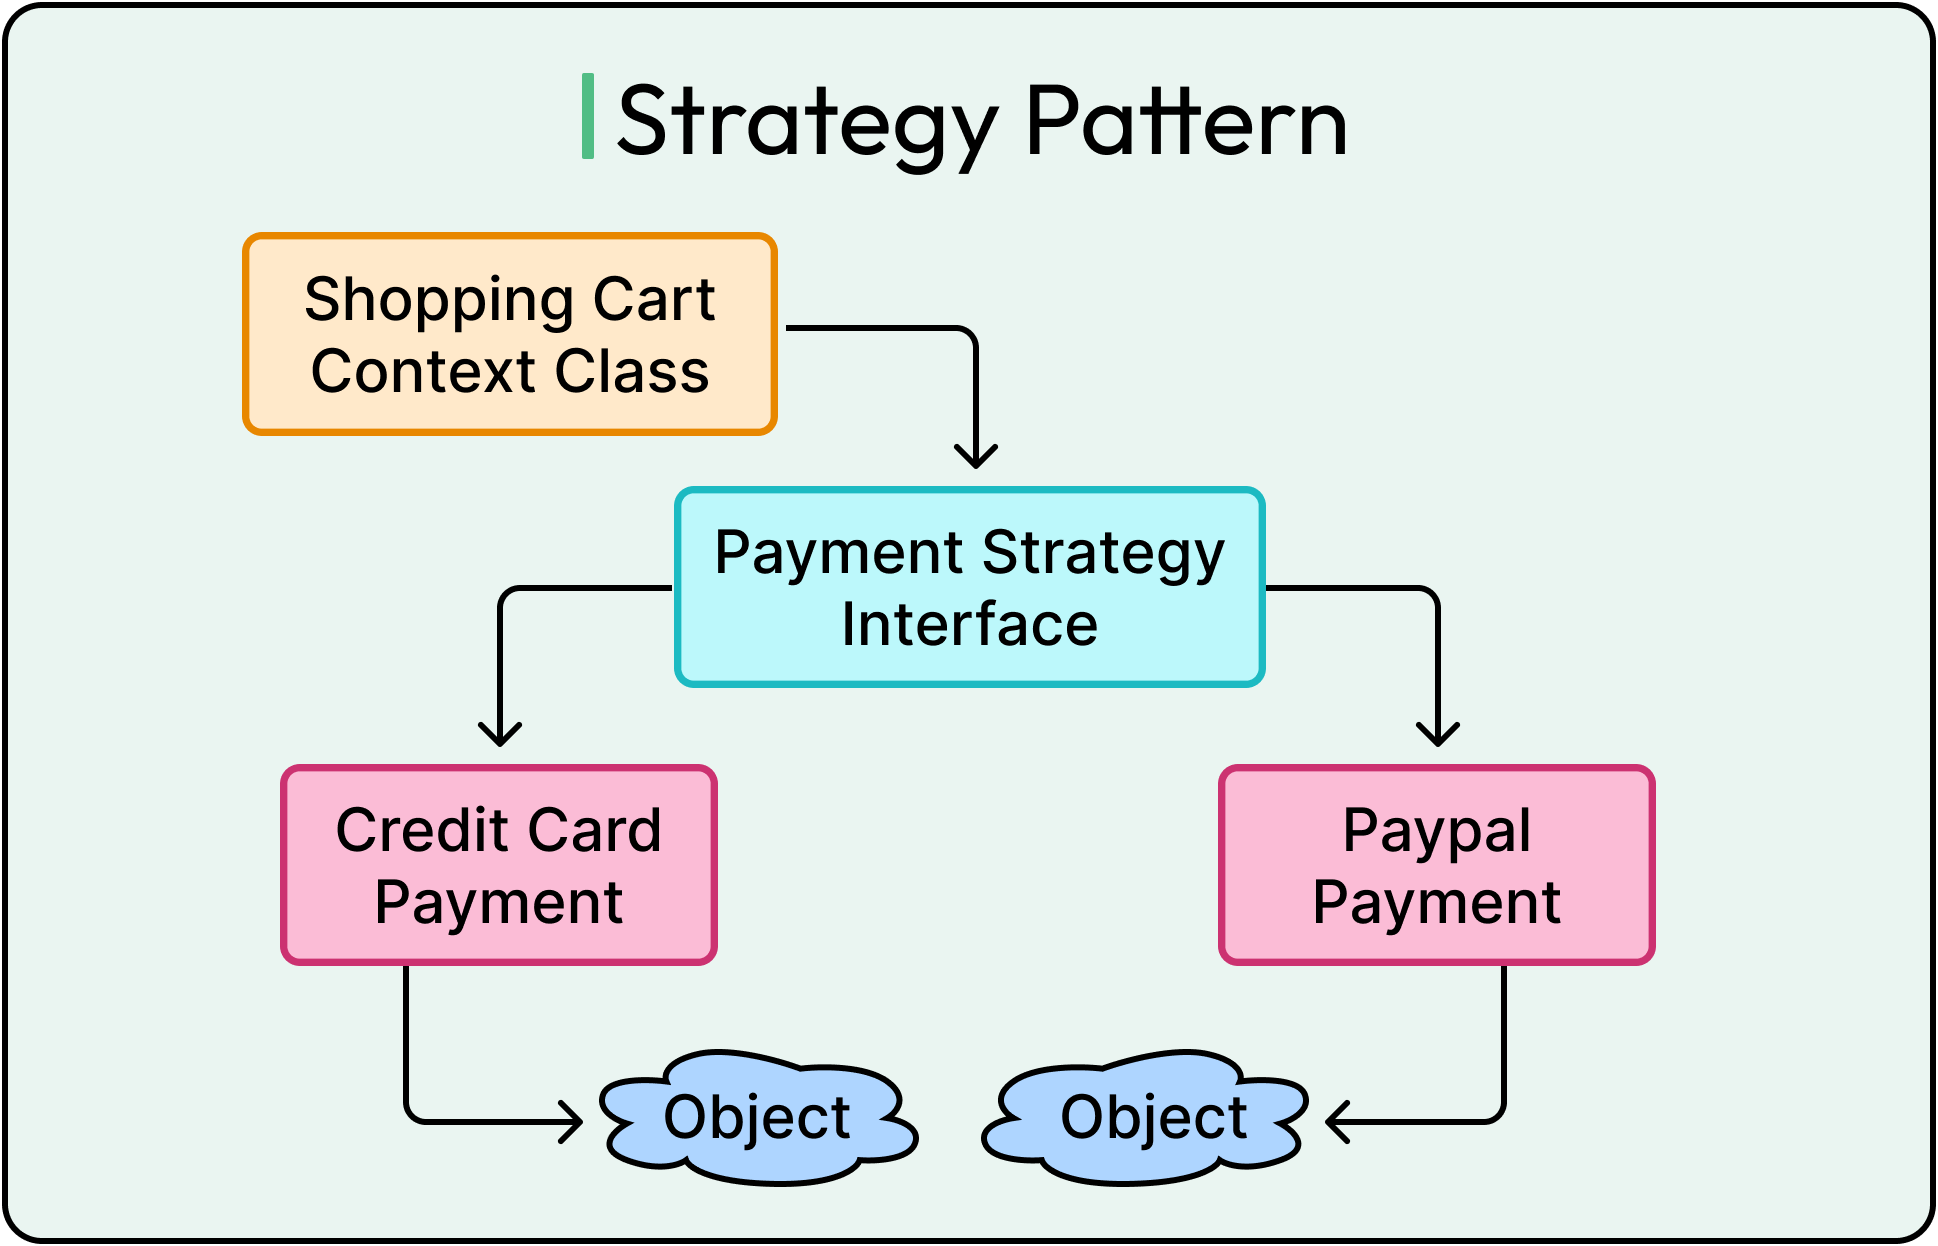
Strategy Pattern
The strategy pattern is a behavioral design pattern that allows an object’s behavior to be selected dynamically at runtime without modifying the existing code.
In many applications, different behaviors need to be selected at runtime. Without the strategy pattern, developers often rely on conditional logic (if-else or switch-case), which violates OCP and makes the code difficult to extend and maintain.
Imagine an e-commerce website where customers can pay using different payment methods such as Credit Card or PayPal. Instead of hardcoding every possible payment method into the system, the strategy pattern allows each payment method to be implemented independently and selected at runtime. The diagram below shows the strategy pattern scenario.
Also, see the code example below for a basic implementation of the strategy pattern:
// Step 1: Define the Strategy Interface
interface PaymentStrategy {
    void pay(int amount);
}

// Step 2: Implement Concrete Payment Strategies

// Credit Card Payment Strategy
class CreditCardPayment implements PaymentStrategy {
    @Override
    public void pay(int amount) {
        System.out.println("Paid $" + amount + " using Credit Card.");
    }
}

// PayPal Payment Strategy
class PayPalPayment implements PaymentStrategy {
    @Override
    public void pay(int amount) {
        System.out.println("Paid $" + amount + " using PayPal.");
    }
}

// Step 3: Implement the Context Class
// ShoppingCart class uses different payment strategies
class ShoppingCart {
    private PaymentStrategy paymentStrategy;

    // Allows setting a payment method dynamically
    public void setPaymentMethod(PaymentStrategy strategy) {
        this.paymentStrategy = strategy;
    }

    public void checkout(int amount) {
        if (paymentStrategy == null) {
            throw new IllegalStateException("Payment method not set.");
        }
        paymentStrategy.pay(amount);
    }
}

// Step 4: Demonstration of the Strategy Pattern
public class Main {
    public static void main(String[] args) {
        ShoppingCart cart = new ShoppingCart();

        // Selecting Credit Card Payment at runtime
        cart.setPaymentMethod(new CreditCardPayment());
        cart.checkout(100); // Output: Paid $100 using Credit Card.

        // Switching to PayPal Payment dynamically
        cart.setPaymentMethod(new PayPalPayment());
        cart.checkout(200); // Output: Paid $200 using PayPal.
    }
}
In this example, new payment methods can be added without modifying the existing ShoppingCart class. The existing code remains unchanged, reducing risk and improving maintainability.
One thing to note is that the Main class is still tightly coupled to the CreditCardPayment and the PayPalPayment class in this example. This isn’t ideal as we saw earlier and can be improved by using a factory or registry to provide the instances dynamically.
While the strategy pattern improves flexibility and promotes open/closed principle, it can also increase the complexity of maintaining multiple strategy classes.
Observer Pattern
The observer pattern is a behavioral design pattern that automatically allows one object (the subject) to notify multiple dependent objects (observers) about state changes.
See the diagram below for reference:
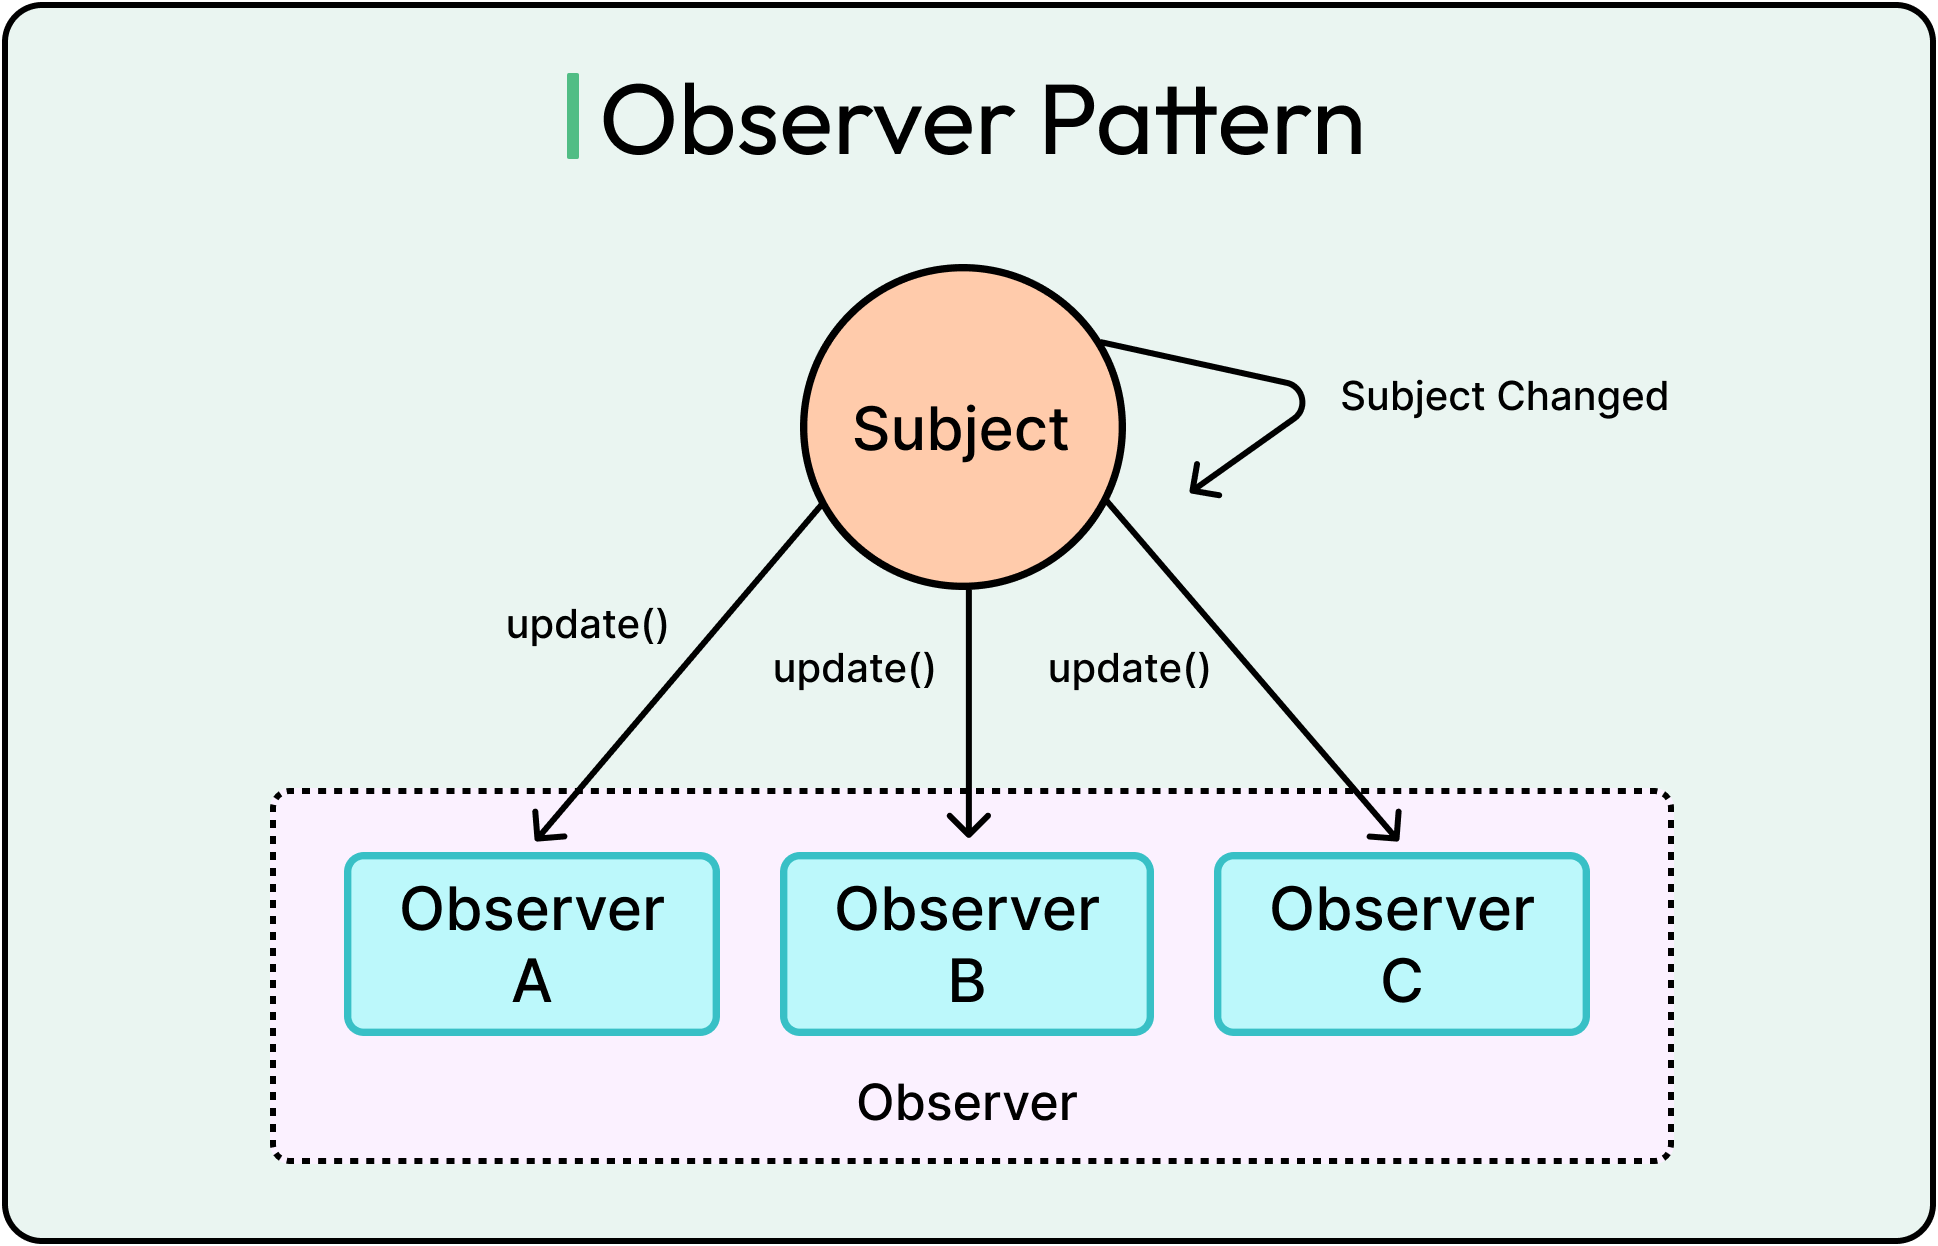
Common use cases of the observer pattern are notification systems, event listeners, stock market feeds, and message broadcast systems.
Here’s a simple example of the observer pattern implementation in Java.
import java.util.ArrayList;
import java.util.List;

// Step 1: Define the Observer Interface
interface Subscriber {
    void update(String videoTitle);
}

// Step 2: Implement Concrete Observers (Users)
class User implements Subscriber {
    private String userName;

    public User(String name) {
        this.userName = name;
    }

    @Override
    public void update(String videoTitle) {
        System.out.println(userName + " received notification: New video uploaded - " + videoTitle);
    }
}

// Step 3: Implement the Subject (Observable)
class Channel {
    private List<Subscriber> subscribers = new ArrayList<>();
    private String channelName;

    public Channel(String name) {
        this.channelName = name;
    }

    // Method to subscribe users
    public void subscribe(Subscriber subscriber) {
        subscribers.add(subscriber);
    }

    // Method to unsubscribe users
    public void unsubscribe(Subscriber subscriber) {
        subscribers.remove(subscriber);
    }

    // Notify all subscribers when new content is uploaded
    public void uploadVideo(String videoTitle) {
        System.out.println(channelName + " uploaded a new video: " + videoTitle);
        notifySubscribers(videoTitle);
    }

    // Notify each subscriber
    private void notifySubscribers(String videoTitle) {
        for (Subscriber subscriber : subscribers) {
            subscriber.update(videoTitle);
        }
    }
}

// Step 4: Demonstrate the Observer Pattern in Action
public class Main {
    public static void main(String[] args) {
        // Create a YouTube Channel (Subject)
        Channel techChannel = new Channel("ByteByteGo");

        // Create Users (Observers)
        User alice = new User("Alice");
        User bob = new User("Bob");
        User charlie = new User("Charlie");

        // Users subscribe to the channel
        techChannel.subscribe(alice);
        techChannel.subscribe(bob);
        techChannel.subscribe(charlie);

        // The channel uploads a new video
        techChannel.uploadVideo("Observer Pattern Explained");

        // Bob unsubscribes
        techChannel.unsubscribe(bob);

        // Another video is uploaded
        techChannel.uploadVideo("Strategy Pattern in Java");
    }
}
The main parts of this code are as follows:
Subscriber Interface: Defines the observer contract (how subscribers react to updates).
User Class (Concrete Observer): Implements Subscriber and defines how users react to video uploads.
Channel Class (Subject/Observable): Maintains a list of subscribers and notifies them when new content is uploaded.
Main Class (Client Code): Demonstrates the pattern in action.
The observer pattern helps reduce coupling and enhances scalability. It also encapsulates the behavior of each observer, which can be customized independently of other observers.
However, the observer pattern also has downsides such as:
If a subject has hundreds or thousands of observers, notifying all of them can cause performance bottlenecks.
Since observers react to changes automatically, debugging becomes harder because it’s not always clear which objects are triggering updates.
If an observer modifies shared data during an update, it may lead to unexpected behavior.
Decorator Pattern
The decorator pattern is a structural design pattern that allows dynamically adding behavior to objects without modifying their existing code.
See the diagram below that show this pattern:
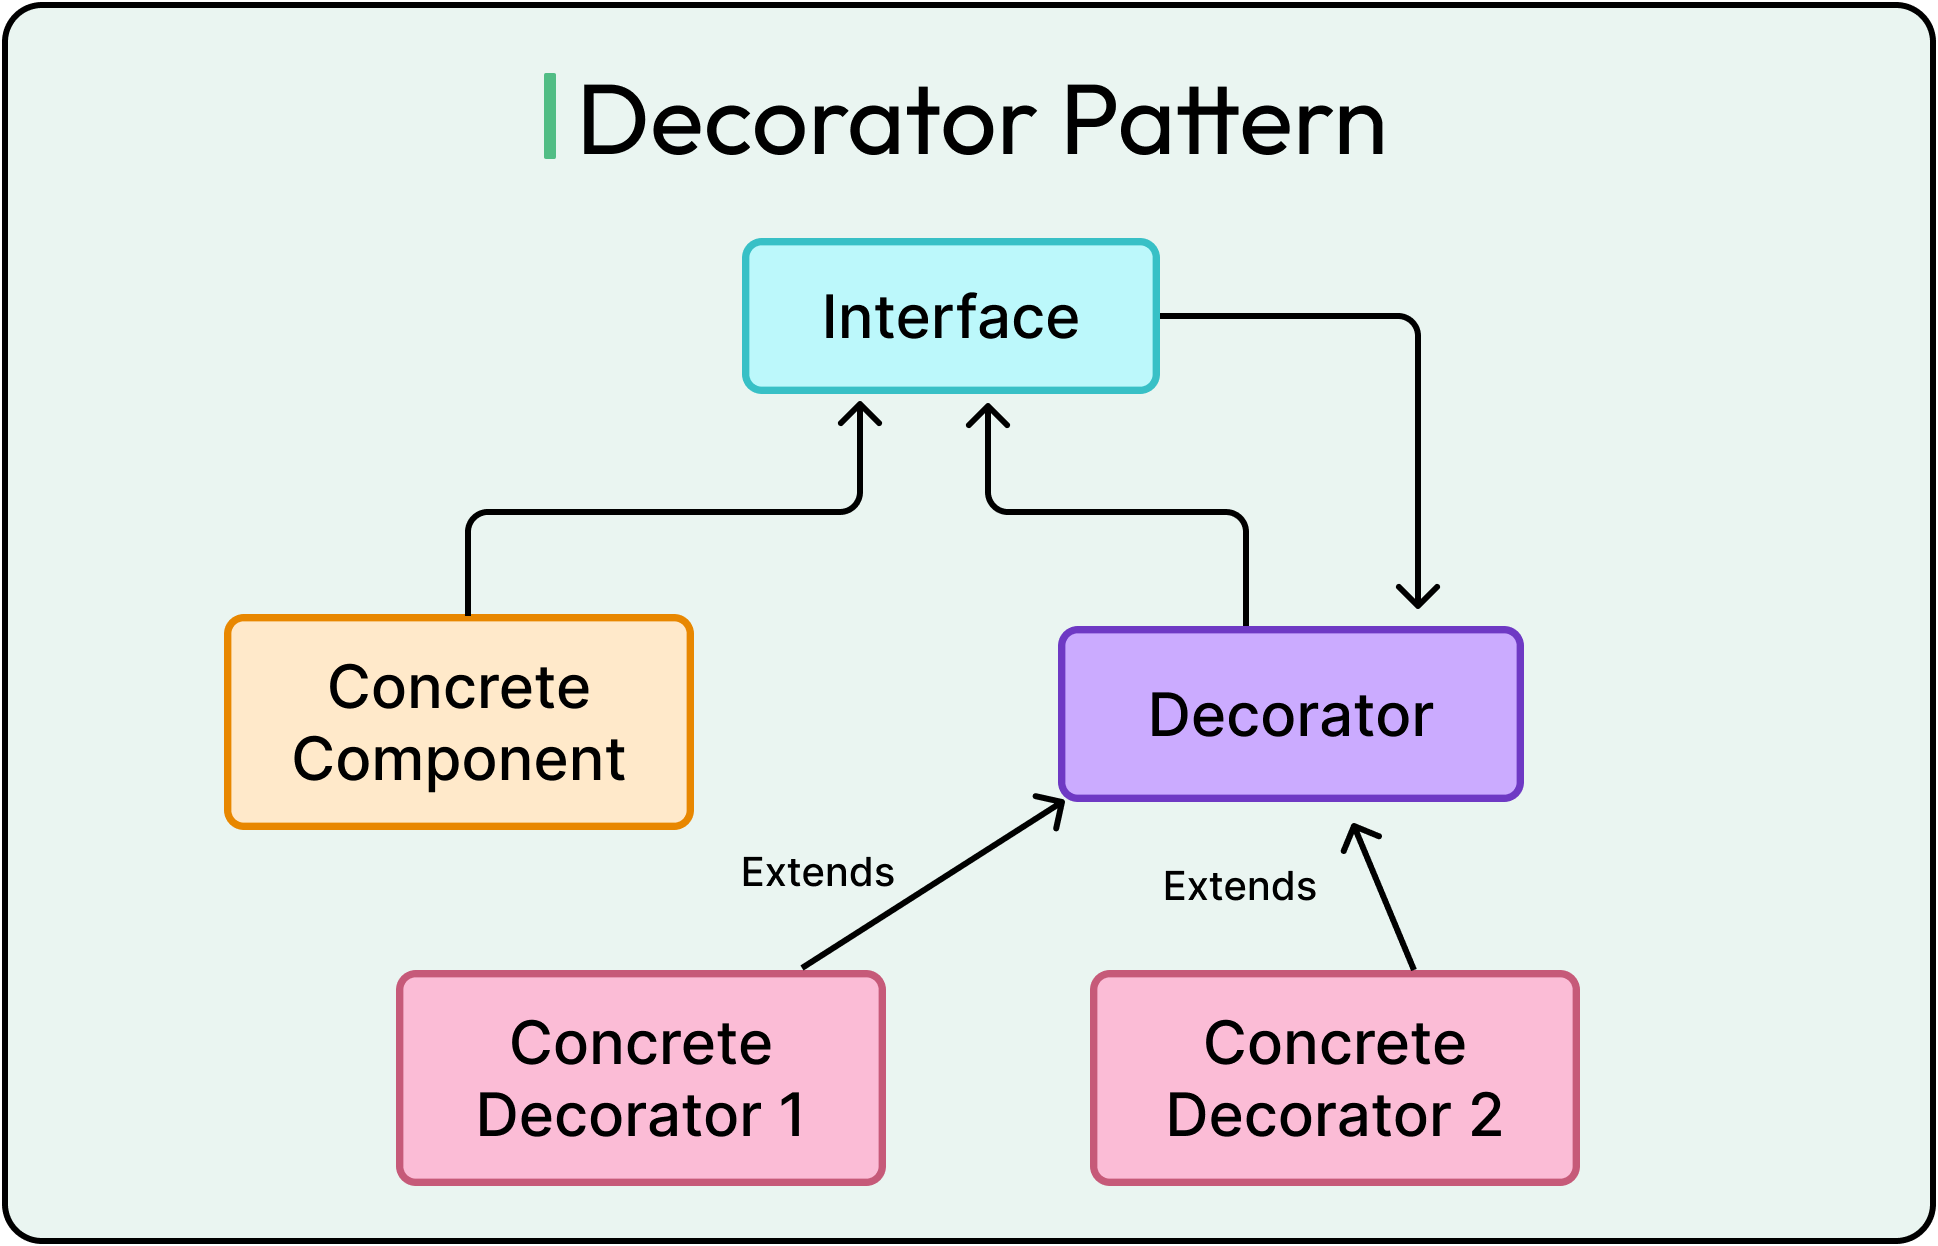
Imagine ordering coffee at a restaurant. After starting with a basic coffee, we want to customize it with milk, sugar, caramel, or extra shots of espresso. Without the decorator pattern, the restaurant would need separate classes like MilkCoffee, SugarCoffee, MilkSugarCoffee, CaramelCoffee, and so on. However, with the decorator pattern, the base Coffee remains the same, and additional features are added dynamically at runtime.
Here’s a basic example of the decorator pattern implementation.
// Step 1: Define the Coffee Interface (Component)
interface Coffee {
    String getDescription();
    double cost();
}

// Step 2: Implement the Base Coffee Class (Concrete Component)
class SimpleCoffee implements Coffee {
    @Override
    public String getDescription() {
        return "Plain Coffee";
    }

    @Override
    public double cost() {
        return 5.0;
    }
}

// Step 3: Create an Abstract Decorator Class
abstract class CoffeeDecorator implements Coffee {
    protected Coffee decoratedCoffee; // Composition: Wraps another Coffee object

    public CoffeeDecorator(Coffee coffee) {
        this.decoratedCoffee = coffee;
    }

    @Override
    public String getDescription() {
        return decoratedCoffee.getDescription();
    }

    @Override
    public double cost() {
        return decoratedCoffee.cost();
    }
}

// Step 4: Implement Concrete Decorators

// Adds Milk to Coffee
class MilkDecorator extends CoffeeDecorator {
    public MilkDecorator(Coffee coffee) {
        super(coffee);
    }

    @Override
    public String getDescription() {
        return decoratedCoffee.getDescription() + ", Milk";
    }

    @Override
    public double cost() {
        return decoratedCoffee.cost() + 1.5;
    }
}

// Adds Sugar to Coffee
class SugarDecorator extends CoffeeDecorator {
    public SugarDecorator(Coffee coffee) {
        super(coffee);
    }

    @Override
    public String getDescription() {
        return decoratedCoffee.getDescription() + ", Sugar";
    }

    @Override
    public double cost() {
        return decoratedCoffee.cost() + 0.5;
    }
}

// Step 5: Demonstrate the Decorator Pattern in Action
public class Main {
    public static void main(String[] args) {
        // Start with Plain Coffee
        Coffee myCoffee = new SimpleCoffee();
        System.out.println(myCoffee.getDescription() + " - $" + myCoffee.cost());

        // Add Milk
        myCoffee = new MilkDecorator(myCoffee);
        System.out.println(myCoffee.getDescription() + " - $" + myCoffee.cost());

        // Add Sugar
        myCoffee = new SugarDecorator(myCoffee);
        System.out.println(myCoffee.getDescription() + " - $" + myCoffee.cost());
    }
}
The decorator pattern makes it easy to add or remove features. It also lets us extend functionality without modifying existing code and adding deep inheritance hierarchies.
Some downsides of the decorator pattern are as follows:
Instead of one large class, there are many small decorator classes. If too many decorators are used, it can become difficult to manage.
Since behavior is distributed across multiple small classes, debugging may take more effort.
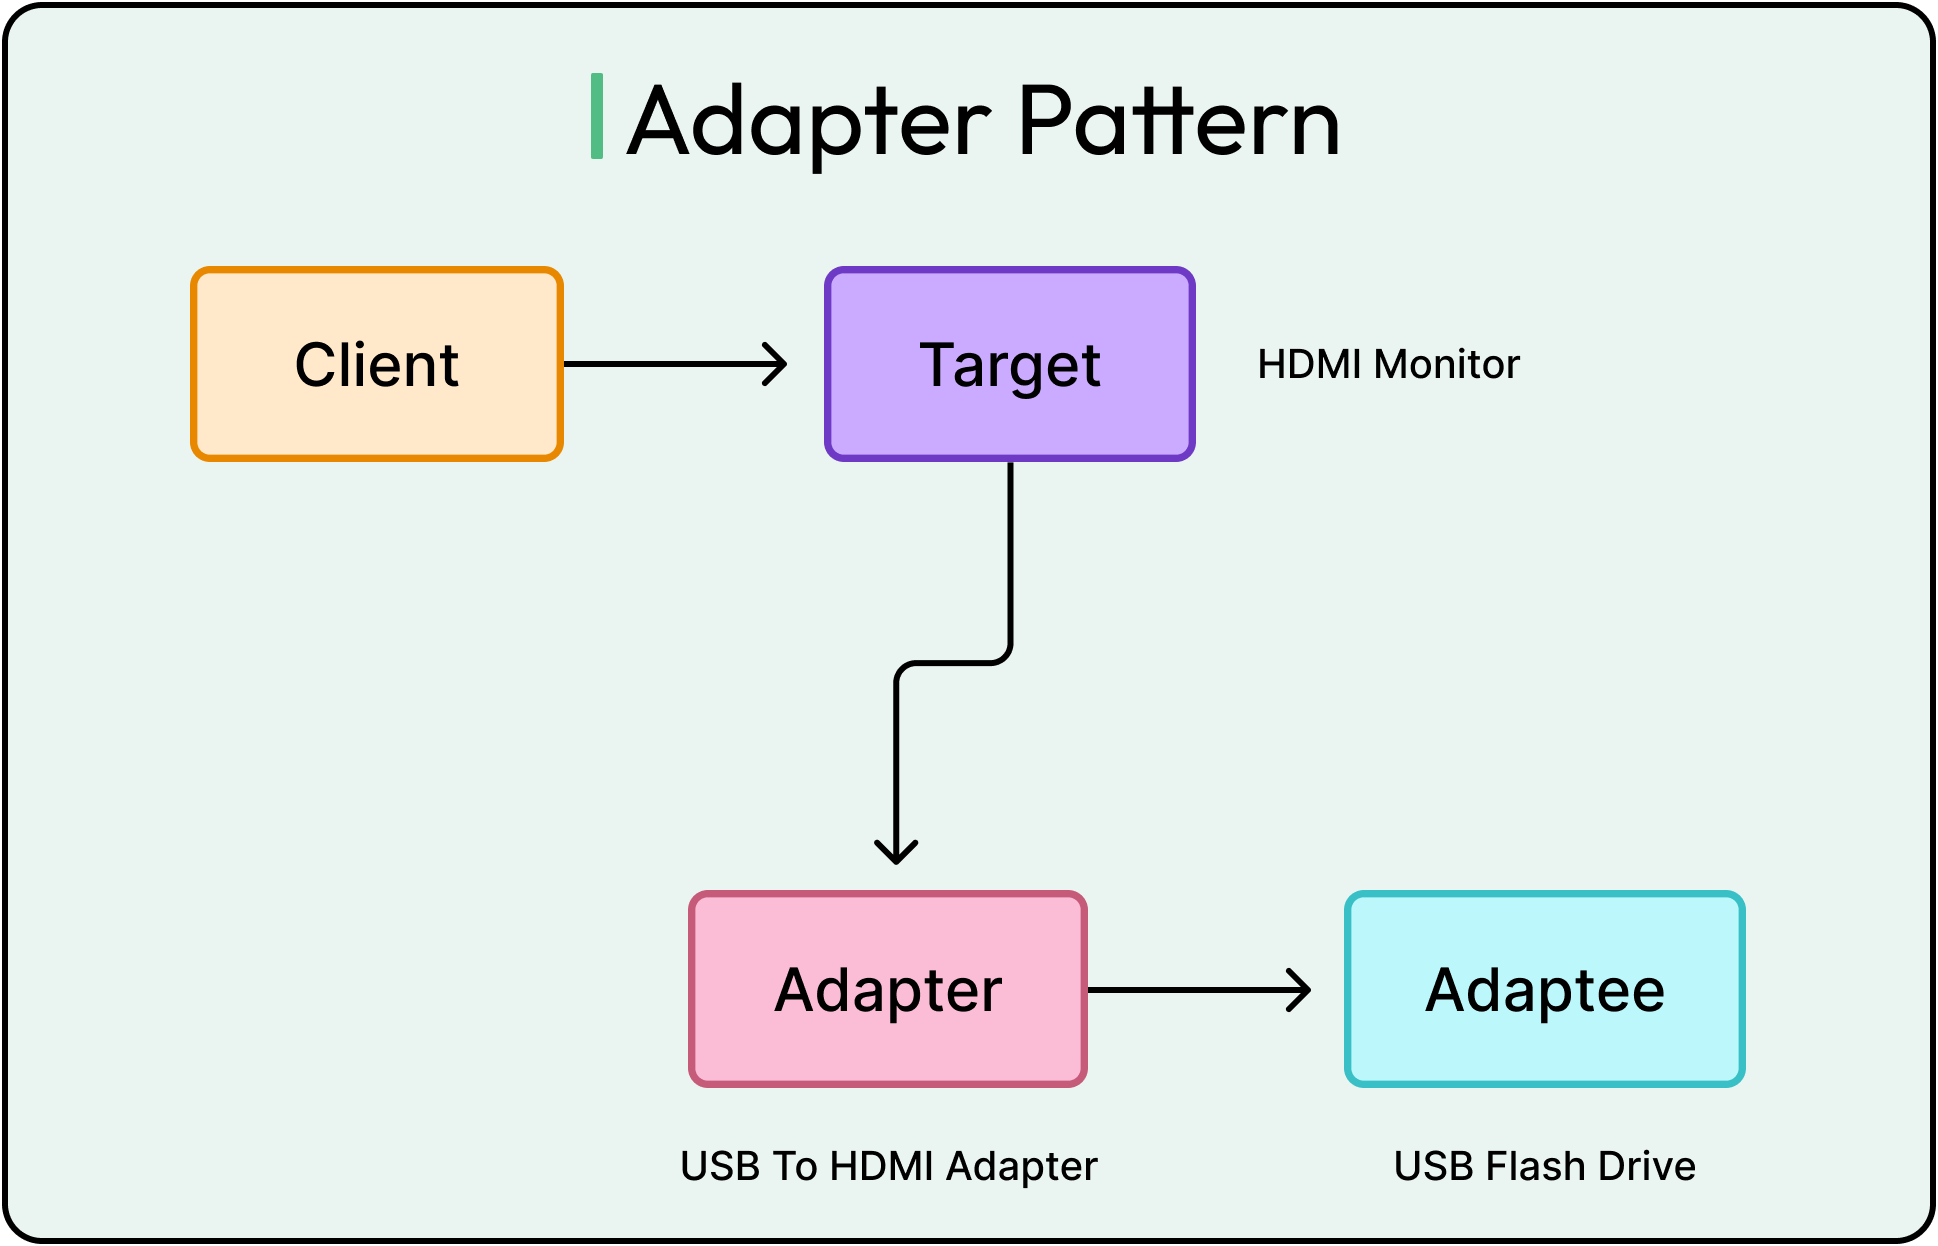
Adapter Pattern
The adapter pattern is a structural design pattern that allows two incompatible interfaces to work together without modifying their existing code.
Some common use cases of the adapter pattern are as follows:
Connecting legacy systems to new applications.
Integrating third-party APIs that have different data formats.
Making different hardware components communicate.
See the code example below that shows the adapter pattern in action using the analogy of a USB to HDMI adapter:
// Step 1: Define the HDMI Monitor Interface (Target)
interface HDMIMonitor {
    void displayHDMI(String content);
}

// Step 2: Implement the Concrete HDMI Monitor
class MyHDMIMonitor implements HDMIMonitor {
    @Override
    public void displayHDMI(String content) {
        System.out.println("Displaying on HDMI Monitor: " + content);
    }
}

// Step 3: Define the USB Device Interface (Incompatible Interface)
interface USBDevice {
    void sendUSB(String data);
}

// Step 4: Implement the Concrete USB Device
class FlashDrive implements USBDevice {
    @Override
    public void sendUSB(String data) {
        System.out.println("USB Device sending data: " + data);
    }
}

// Step 5: Implement the Adapter (USB to HDMI)
class USBToHDMIAdapter implements HDMIMonitor {
    private USBDevice usbDevice;

    // Constructor accepts a USB device
    public USBToHDMIAdapter(USBDevice usbDevice) {
        this.usbDevice = usbDevice;
    }

    @Override
    public void displayHDMI(String content) {
        System.out.println("Adapter converting USB data to HDMI format...");
        usbDevice.sendUSB(content); // Converts USB data to HDMI
    }
}

// Step 6: Demonstrate the Adapter Pattern in Client Code
public class Main {
    public static void main(String[] args) {
        // Directly using an HDMI Monitor
        HDMIMonitor hdmiMonitor = new MyHDMIMonitor();
        hdmiMonitor.displayHDMI("Direct HDMI Signal");

        // Using a USB Device (Incompatible)
        USBDevice usbFlashDrive = new FlashDrive();

        // Using an Adapter to connect USB to HDMI Monitor
        HDMIMonitor adapter = new USBToHDMIAdapter(usbFlashDrive);
        adapter.displayHDMI("USB Data Stream");
    }
}
The various parts of this code example are as follows:
HDMIMonitor Interface (Target): Represents HDMI monitors that accept HDMI input.
MyHDMIMonitor Class (Concrete Target): A real HDMI monitor that displays content.
USBDevice Interface (Incompatible Interface): Represents USB devices that send USB signals.
FlashDrive Class (Concrete Adaptee): A USB flash drive that sends USB data.
USBToHDMIAdapter Class (Adapter): Converts USB signals into HDMI-compatible format.
Main Class (Client): Demonstrates how adapter allows a USB device to work with an HDMI monitor.
The adapter pattern helps support different input and output formats. It also follows the open/closed principle and single responsibility principle.
However, the adapter pattern also has some downsides:
It introduces extra classes, which can increase code complexity.
If the adapter requires significant data transformation, it may introduce processing delays.
If we control the original class, it may be better to refactor it instead of using an adapter.
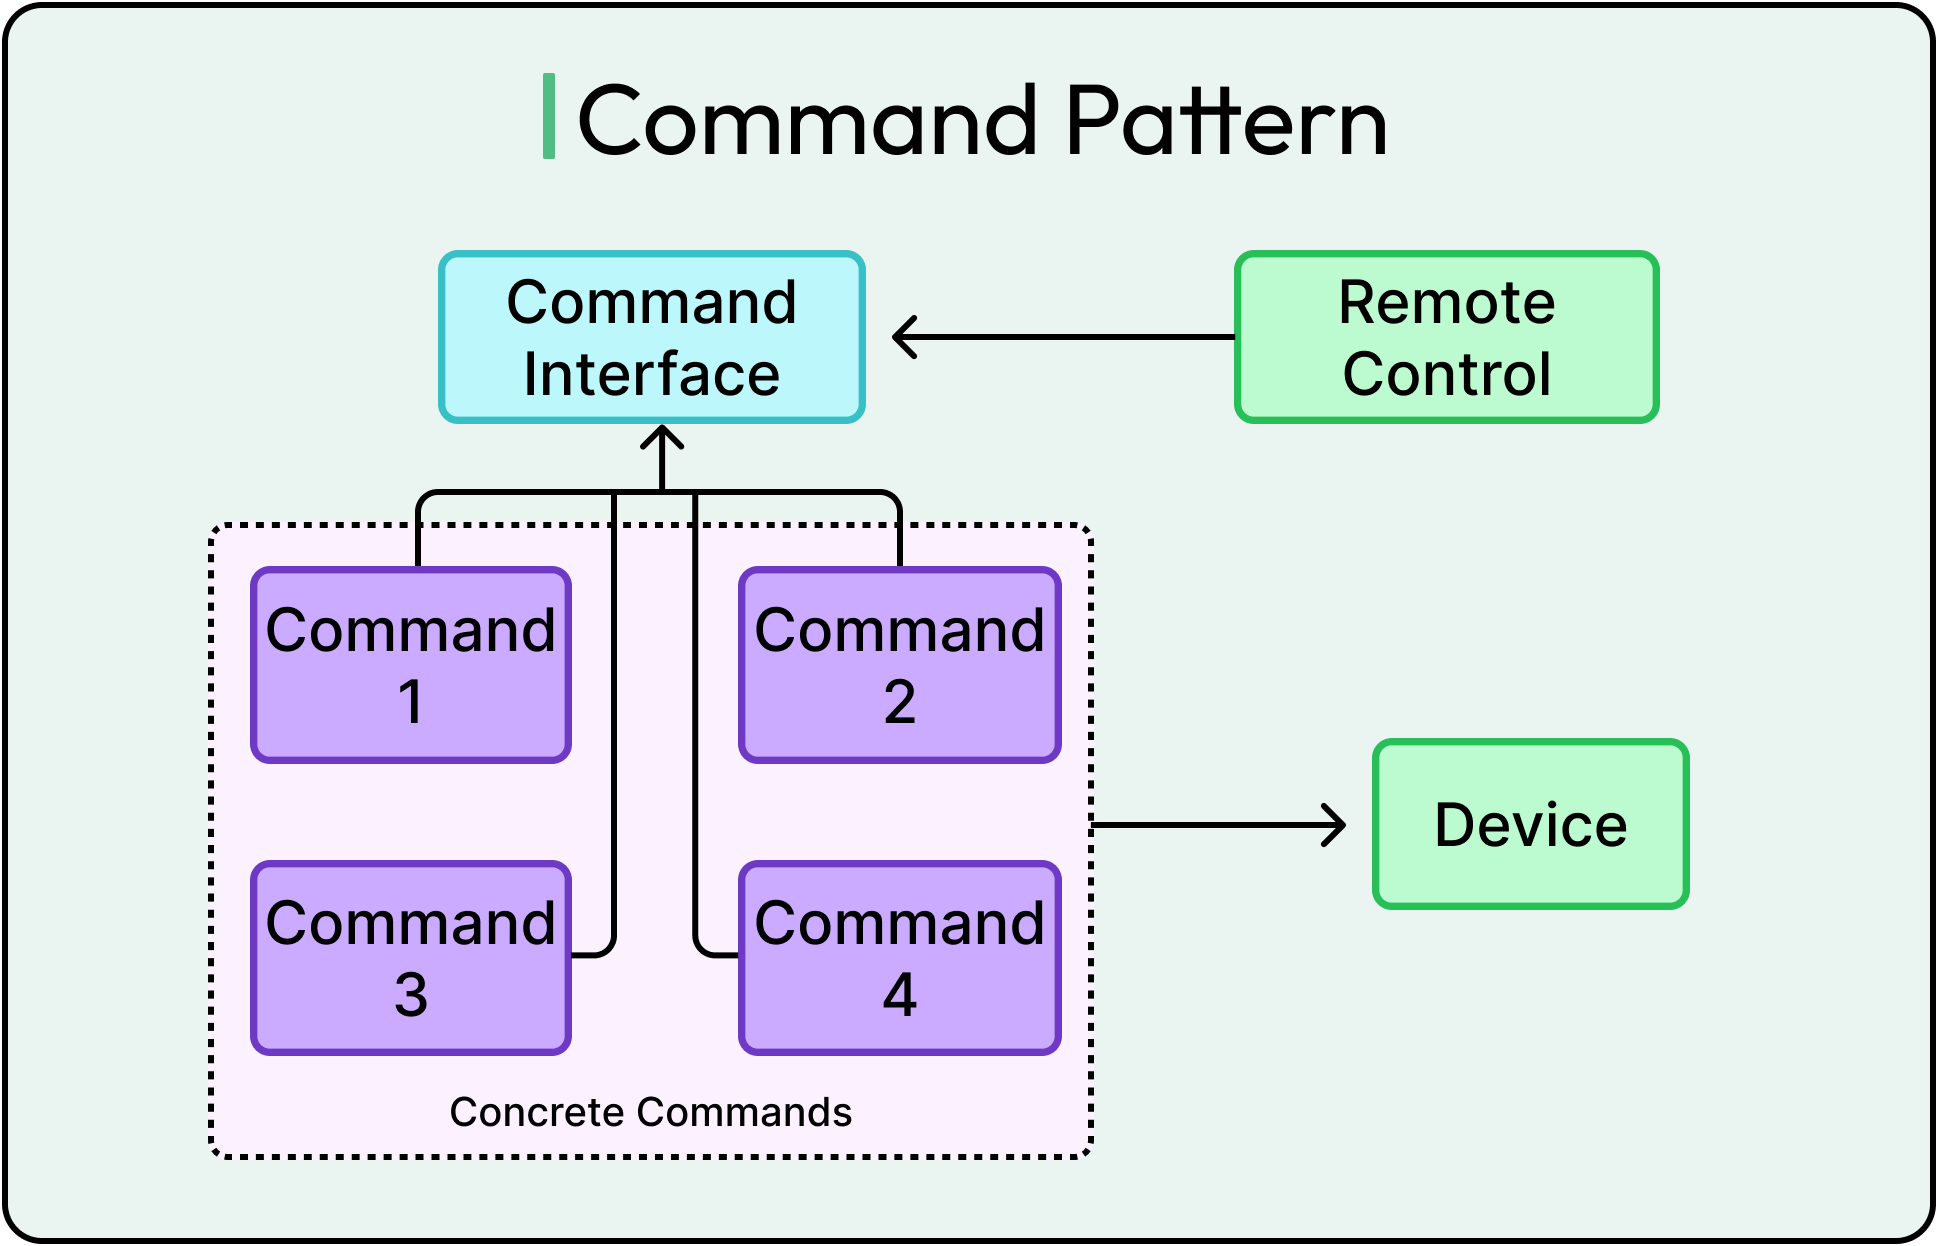
Command Pattern
The command pattern is a behavioral design pattern that encapsulates operations as objects.
When a system directly calls methods on objects, it creates tight coupling between the invoker (caller) and the receiver (actual object performing the action).
The command pattern solves this by encapsulating each operation as a command object. This pattern can be understood by looking at the remote control where each button on the remote is a command.
The diagram shows this example:
See the code example below for a sample implementation of the command pattern:
// Step 1: Define the Command Interface
interface Command {
    void execute();
    void undo();
}

// Step 2: Create the Receiver (Light)
class Light {
    public void turnOn() {
        System.out.println("Light is ON");
    }

    public void turnOff() {
        System.out.println("Light is OFF");
    }
}

// Step 3: Implement Concrete Commands
// Command to Turn Light On
class TurnOnCommand implements Command {
    private Light light;

    public TurnOnCommand(Light light) {
        this.light = light;
    }

    @Override
    public void execute() {
        light.turnOn();
    }

    @Override
    public void undo() {
        light.turnOff();
    }
}

// Command to Turn Light Off
class TurnOffCommand implements Command {
    private Light light;

    public TurnOffCommand(Light light) {
        this.light = light;
    }

    @Override
    public void execute() {
        light.turnOff();
    }

    @Override
    public void undo() {
        light.turnOn();
    }
}

// Step 4: Implement the Invoker (Remote Control)
class RemoteControl {
    private Command lastCommand;

    public void pressButton(Command command) {
        command.execute();
        lastCommand = command; // Store last command for undo
    }

    public void pressUndo() {
        if (lastCommand != null) {
            lastCommand.undo();
        } else {
            System.out.println("No command to undo.");
        }
    }
}

// Step 5: Demonstrate the Command Pattern in Client Code
public class Main {
    public static void main(String[] args) {
        // Create Receiver (Light)
        Light livingRoomLight = new Light();

        // Create Commands
        Command turnOn = new TurnOnCommand(livingRoomLight);
        Command turnOff = new TurnOffCommand(livingRoomLight);

        // Create Invoker (Remote Control)
        RemoteControl remote = new RemoteControl();

        // Execute Commands
        remote.pressButton(turnOn);  // Output: Light is ON
        remote.pressUndo();          // Output: Light is OFF

        remote.pressButton(turnOff); // Output: Light is OFF
        remote.pressUndo();          // Output: Light is ON
    }
}
Here’s what each part of the code is doing:
Command Interface: Defines the structure for executing and undoing actions.
Light Class (Receiver): The actual object being controlled.
TurnOnCommand & TurnOffCommand (Concrete Commands): Encapsulate the logic for turning the light on/off.
RemoteControl (Invoker): Triggers commands and supports undo functionality.
Main (Client Code): Demonstrates the Command Pattern in action.
As mentioned, the command pattern helps decouple command execution from the sender and is easy to extend.
However, it can also increase complexity since it requires multiple extra classes for different commands.
Proxy Pattern
The proxy pattern is a structural design pattern that provides a substitute or placeholder for another object.
Sometimes, direct access to an object is costly or risky. The proxy pattern solves this by intercepting requests and deciding when and how the real object should be accessed.
Common use cases are security proxy, virtual proxy (loading heavy objects when needed), remote proxy (handling network communication between objects), caching proxy, and logging proxy.
See the example below for a basic proxy pattern implementation:
// Step 1: Define the Image Interface (Subject)
interface Image {
    void display();
}

// Step 2: Implement the RealImage Class (Actual Heavy Object)
class RealImage implements Image {
    private String fileName;

    public RealImage(String fileName) {
        this.fileName = fileName;
        loadImageFromDisk(); // Simulate expensive operation
    }

    private void loadImageFromDisk() {
        System.out.println("Loading high-resolution image: " + fileName);
    }

    @Override
    public void display() {
        System.out.println("Displaying image: " + fileName);
    }
}

// Step 3: Implement the Proxy Class
class ImageProxy implements Image {
    private RealImage realImage;
    private String fileName;

    public ImageProxy(String fileName) {
        this.fileName = fileName;
    }

    @Override
    public void display() {
        if (realImage == null) {
            realImage = new RealImage(fileName); // Load only when needed
        }
        realImage.display();
    }
}

// Step 4: Demonstrate the Proxy Pattern in Client Code
public class Main {
    public static void main(String[] args) {
        // Using Proxy instead of directly creating RealImage
        Image image1 = new ImageProxy("Photo1.jpg");
        Image image2 = new ImageProxy("Photo2.jpg");

        // The images are not loaded yet
        System.out.println("Proxy created, but images are not loaded yet.");

        // Now we display the image (this triggers loading)
        image1.display(); // Loads and displays
        image1.display(); // Displays instantly (no loading again)

        // Display another image
        image2.display(); // Loads and displays
    }
}
The main parts of this code are as follows:
Image Interface (Subject): Defines the contract for displaying images.
RealImage Class (Heavy Object): Simulates a high-resolution image that is slow to load.
ImageProxy Class (Proxy): Delays image loading until display() is called.
Main Class (Client Code): Uses the proxy to manage image loading.
The diagram below shows this setup:
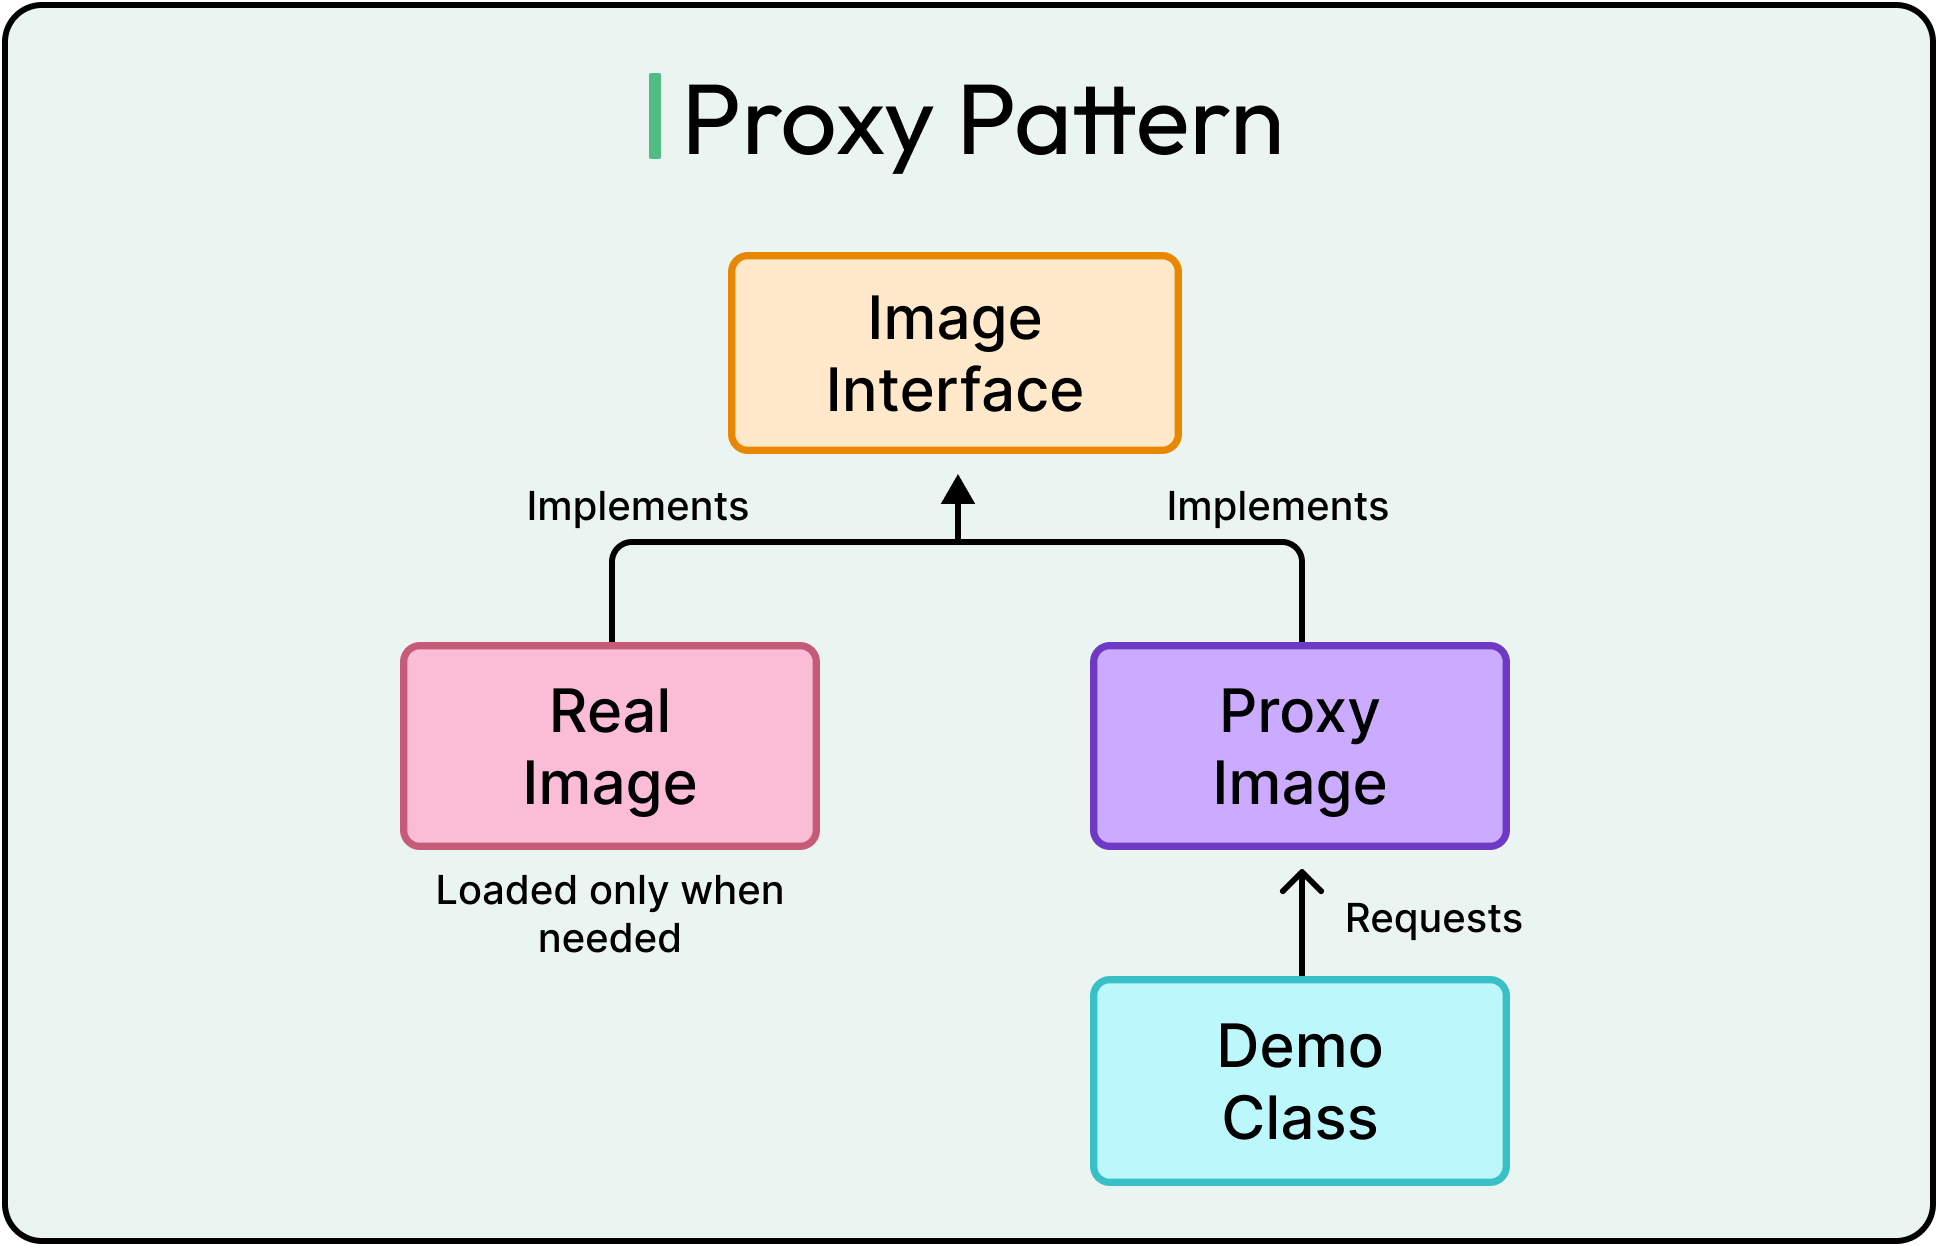
The proxy pattern helps delay expensive operations until they are needed. Also, it allows developers to add functionality (such as logging and caching) without modifying code.
As usual, the downsides of the proxy pattern include increased code complexity, potential increase in latency, and hidden dependencies.
Builder Pattern
The builder pattern is a creational design pattern that simplifies the construction of complex objects by separating the object creation process from its representation.
When creating objects with multiple parameters, we often face two issues:
Too many constructor overloads
Unclear parameter order
The builder pattern solves this by providing a step-by-step object construction process.
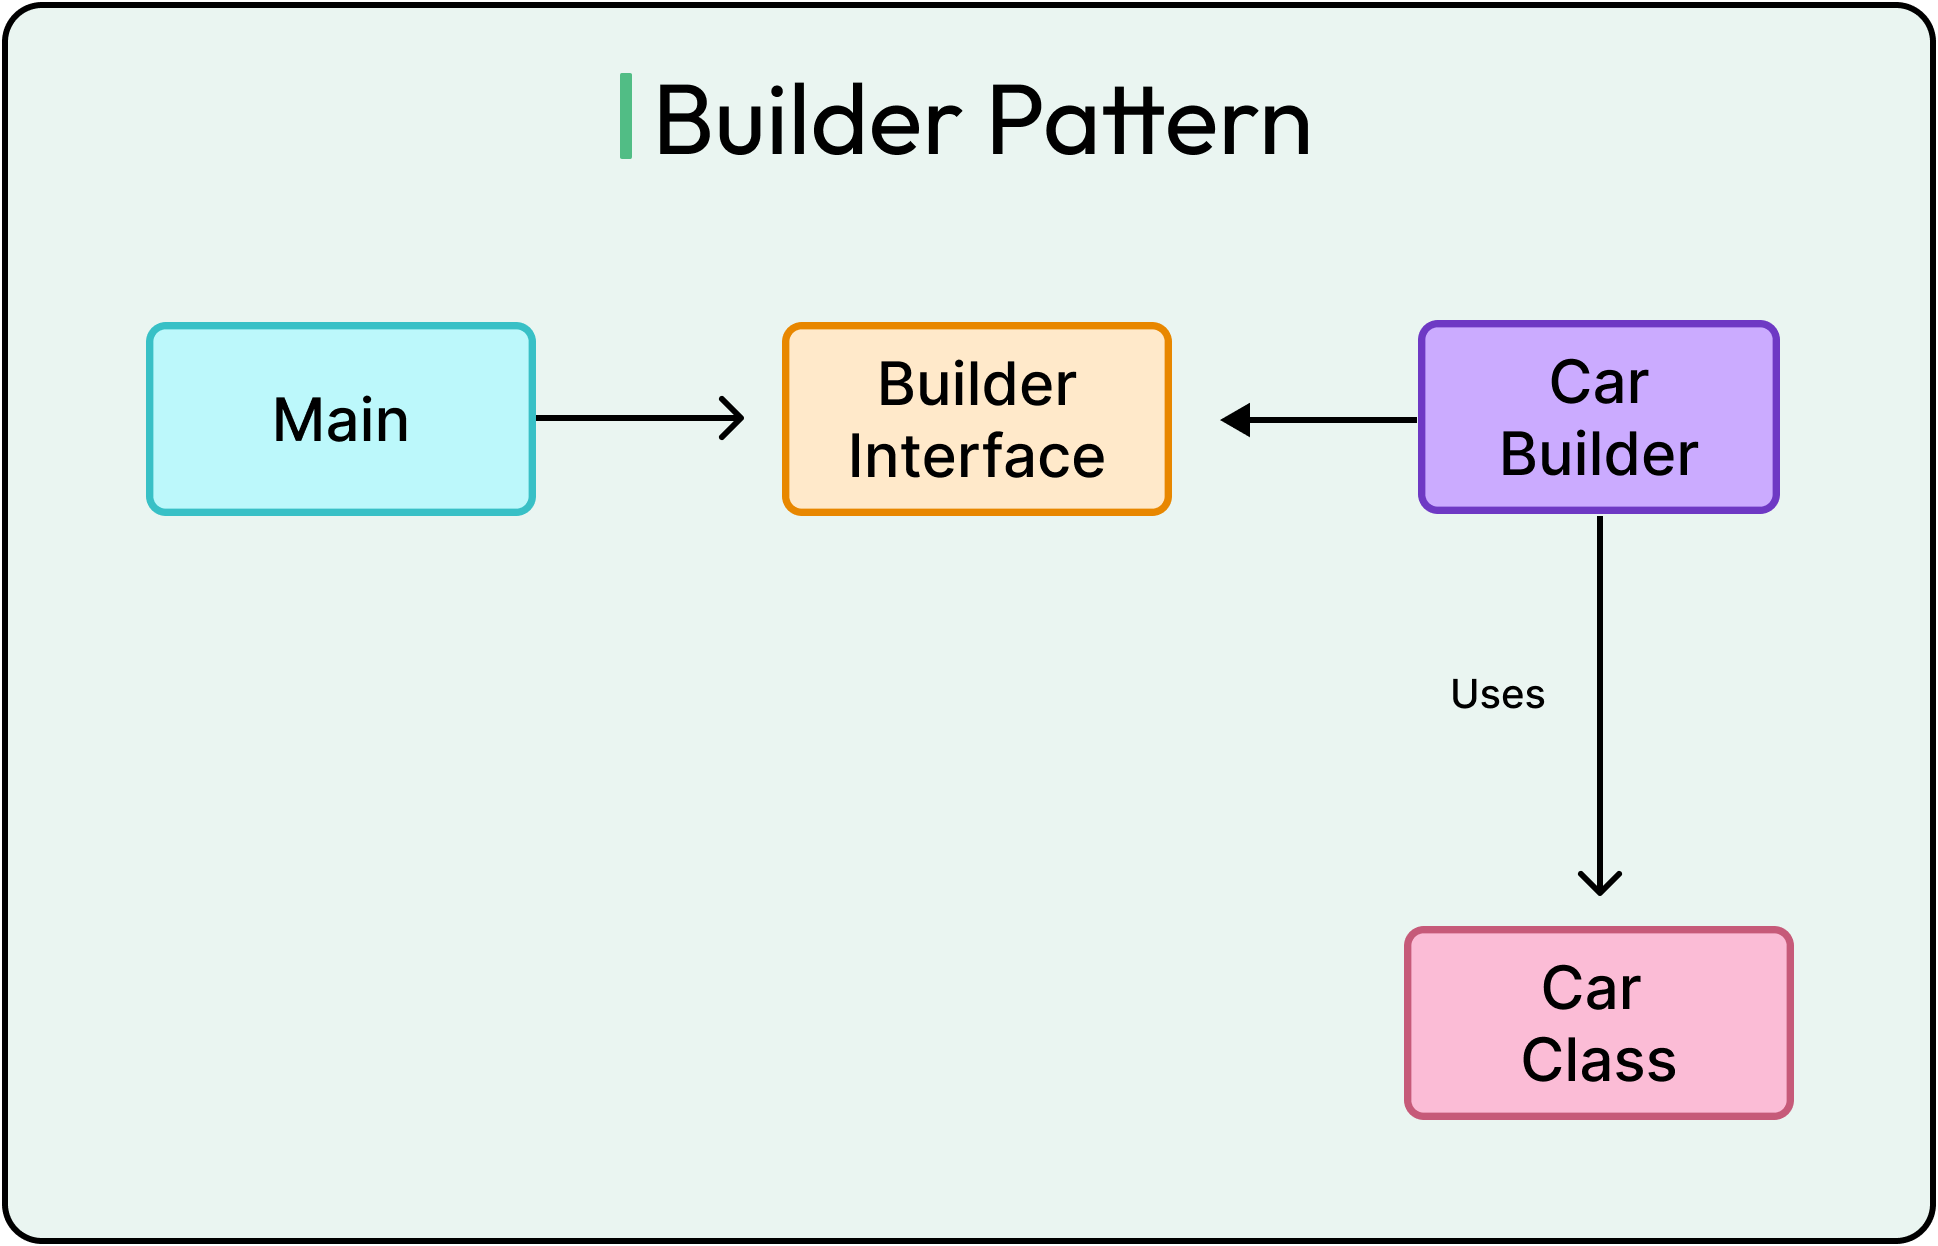
Let's implement a Car customization system, where:
Car (Product): Represents the final car object.
CarBuilder (Builder): Constructs Car step by step.
Main (Client Code): Uses CarBuilder to create different car configurations.
See the example below:
// Product: Car
class Car {
    private String engine;
    private int wheels;
    private boolean hasSunroof;
    private String color;

    // Private constructor to enforce object creation via Builder
    private Car(CarBuilder builder) {
        this.engine = builder.engine;
        this.wheels = builder.wheels;
        this.hasSunroof = builder.hasSunroof;
        this.color = builder.color;
    }

    @Override
    public String toString() {
        return "Car [Engine: " + engine + ", Wheels: " + wheels + ", Sunroof: " + hasSunroof + ", Color: " + color + "]";
    }

    // Builder Class
    public static class CarBuilder {
        private String engine;
        private int wheels;
        private boolean hasSunroof;
        private String color;

        // Step-by-step methods to set attributes
        public CarBuilder setEngine(String engine) {
            this.engine = engine;
            return this; // Enables method chaining
        }

        public CarBuilder setWheels(int wheels) {
            this.wheels = wheels;
            return this;
        }

        public CarBuilder setSunroof(boolean hasSunroof) {
            this.hasSunroof = hasSunroof;
            return this;
        }

        public CarBuilder setColor(String color) {
            this.color = color;
            return this;
        }

        // Method to construct the final Car object
        public Car build() {
            return new Car(this);
        }
    }
}

public class Main {
    public static void main(String[] args) {
        // Building a sports car with a sunroof
        Car sportsCar = new Car.CarBuilder()
                .setEngine("V8")
                .setWheels(4)
                .setSunroof(true)
                .setColor("Red")
                .build();

        System.out.println(sportsCar);

        // Building a basic sedan with only an engine and wheels
        Car basicCar = new Car.CarBuilder()
                .setEngine("V4")
                .setWheels(4)
                .build();

        System.out.println(basicCar);
    }
}
The builder pattern improves code readability and eliminates constructor overload issues. If new attributes are added, no changes are needed in the existing client code.
However, the potential downside is the increased complexity if the object is already simple. Therefore, this pattern is more suitable in the case of complex object construction.
Composite Pattern
The composite pattern is a structural design pattern that allows individual objects (leaf nodes) and groups of objects (composites) to be treated uniformly.
It is useful when objects are organized in a tree structure, such as company hierarchies and file systems. The problem with handling hierarchies manually is that objects can have sub-objects and are difficult to manage without a unified interface.
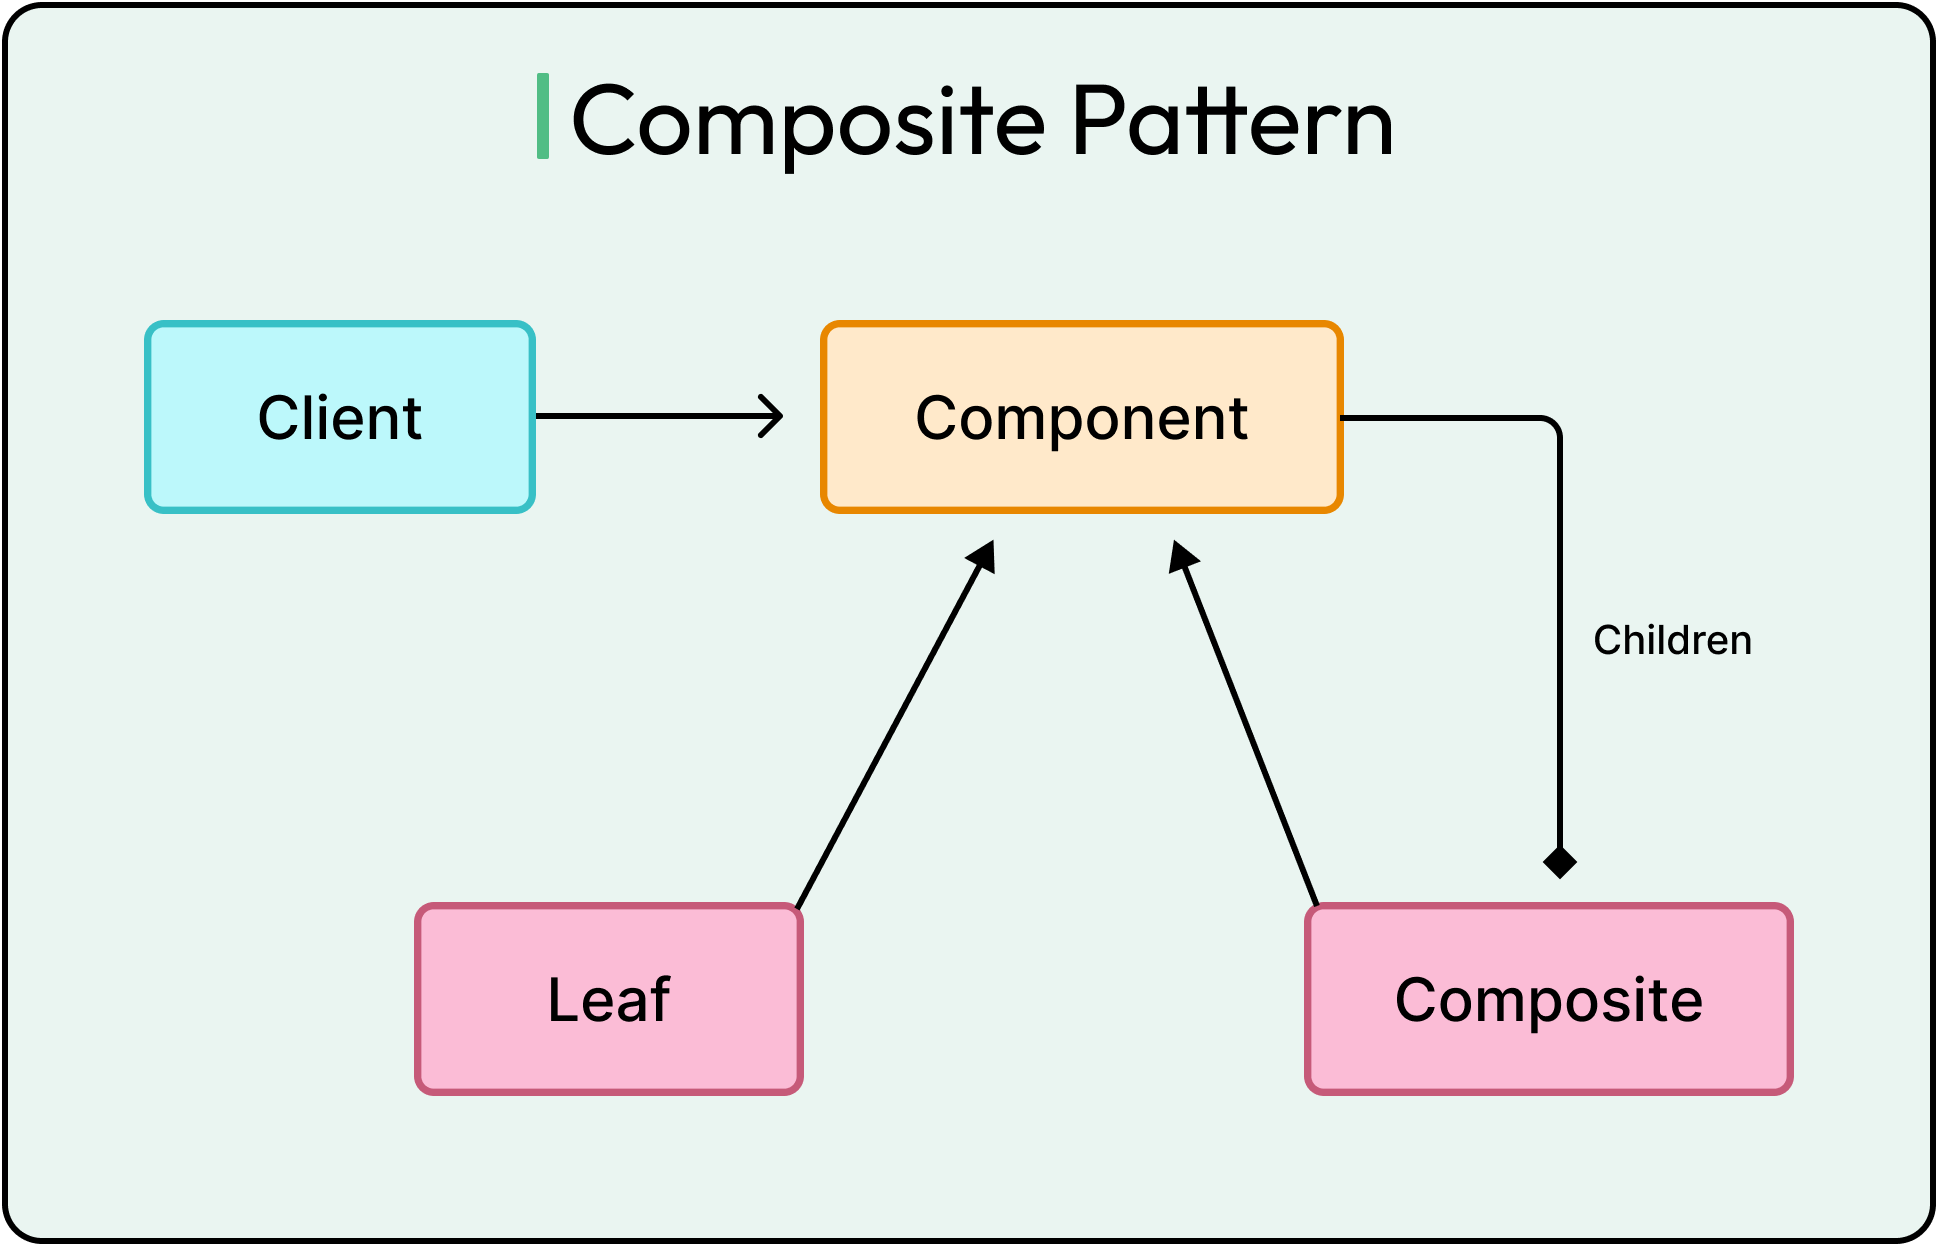
The composite pattern provides a unified interface. To demonstrate the same, we will implement a basic file system with the following classes:
FileSystemComponent (Component): Defines common operations for Files and Folders.
File (Leaf Node): Represents individual files.
Folder (Composite Node): Represents directories that contain files and subfolders.
See the code example below:
import java.util.ArrayList;
import java.util.List;

// Step 1: Define the Component Interface
interface FileSystemComponent {
    void showDetails();
}

// Step 2: Implement the File Class (Leaf Node)
class File implements FileSystemComponent {
    private String name;

    public File(String name) {
        this.name = name;
    }

    @Override
    public void showDetails() {
        System.out.println("File: " + name);
    }
}

// Step 3: Implement the Folder Class (Composite Node)
class Folder implements FileSystemComponent {
    private String name;
    private List<FileSystemComponent> components = new ArrayList<>();

    public Folder(String name) {
        this.name = name;
    }

    public void addComponent(FileSystemComponent component) {
        components.add(component);
    }

    public void removeComponent(FileSystemComponent component) {
        components.remove(component);
    }

    @Override
    public void showDetails() {
        System.out.println("Folder: " + name);
        for (FileSystemComponent component : components) {
            component.showDetails(); // Recursively call on sub-components
        }
    }
}

// Step 4: Demonstrate the Composite Pattern in Client Code
public class Main {
    public static void main(String[] args) {
        // Create Files
        FileSystemComponent file1 = new File("Document.pdf");
        FileSystemComponent file2 = new File("Photo.jpg");
        FileSystemComponent file3 = new File("Video.mp4");

        // Create a Folder and add Files
        Folder folder1 = new Folder("My Folder");
        folder1.addComponent(file1);
        folder1.addComponent(file2);

        // Create another Folder and add a File
        Folder folder2 = new Folder("Sub Folder");
        folder2.addComponent(file3);

        // Add subfolder to parent folder
        folder1.addComponent(folder2);

        // Display File System Structure
        folder1.showDetails();
    }
}
The composite pattern helps encapsulate complex hierarchies and follows the open/closed principle.
However, potential downsides include overhead and managing parent-child relationships.
OOP Anti-Patterns
While the design patterns make a developer’s life easier, a developer should also be careful about avoiding anti-patterns.
Anti-patterns in OOP lead to poor software design, making code harder to maintain, test, and extend. Some common anti-patterns are as follows:
1 - God Object
A God object is a class that takes on too many responsibilities, violating the single responsibility principle.
Instead of delegating tasks, it controls multiple aspects of the system, making it difficult to modify or test. Here’s an example of a class that acts like a God object.
class GodObject {
    void processPayroll() { /* Payroll logic */ }
    void handleCustomerService() { /* Customer support */ }
    void manageHR() { /* Employee records */ }
}
This class is responsible for multiple concerns, making the system fragile.
2 - Circular Dependencies
Circular dependencies occur when two or more classes depend on each other, creating a dependency loop.
This can lead to runtime errors, infinite loops, or difficulty in dependency injection frameworks like Spring. See the example below of a piece of code that creates an infinite loop when initializing objects.
class ClassA { private ClassB b; ClassA(ClassB b) { this.b = b; } }
class ClassB { private ClassA a; ClassB(ClassA a) { this.a = a; } }
3 - Tight Coupling
Tight coupling occurs when one class is highly dependent on another, making changes difficult and violating the open/closed principle.
See the example below:
class Car {
   private Engine engine = new Engine();
   void start() { engine.start();
   }
}
Summary
In this article, we have looked at OOP design-patterns and anti-patterns in detail with appropriate examples:
Let’s summarize the key learning points in brief:
Design patterns provide reusable solutions to common software design problems, making code more scalable, maintainable, and flexible.
Factory pattern encapsulates object creation to reduce tight coupling and improve code extensibility.
Singleton pattern ensures only one instance of a class exists within the context of an application.
Strategy pattern allows dynamic selection of behaviors at runtime without modifying existing code.
Observer pattern enables event-driven communication, where multiple observers react to changes in a subject.
Decorator pattern dynamically adds behavior to objects at runtime without modifying their structure.
Adapter pattern bridges incompatible interfaces, allowing reuse of existing code with new systems.
Command pattern encapsulates operations as objects.
Proxy pattern controls access to objects, improving security, performance, and lazy loading.
Builder pattern constructs complex objects step by step, improving readability and avoiding constructor overloads.
Composite pattern treats individual and grouped objects uniformly, simplifying hierarchical structures.


What you should be doing is disintangling these patterns from OOP.